|
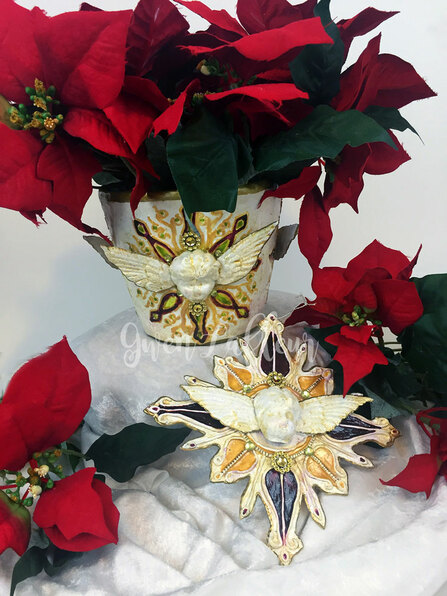
From looking at my artwork it's probably not a huge surprise to anyone to learn that my holiday decor is a mix of classic, bohemian, and just plain eclectic. I tend to be picky about the decorations that I put out in my house at Christmastime, so working on these pieces was a fun opportunity for me to create something I would use that would also fit with my personal aesthetic.
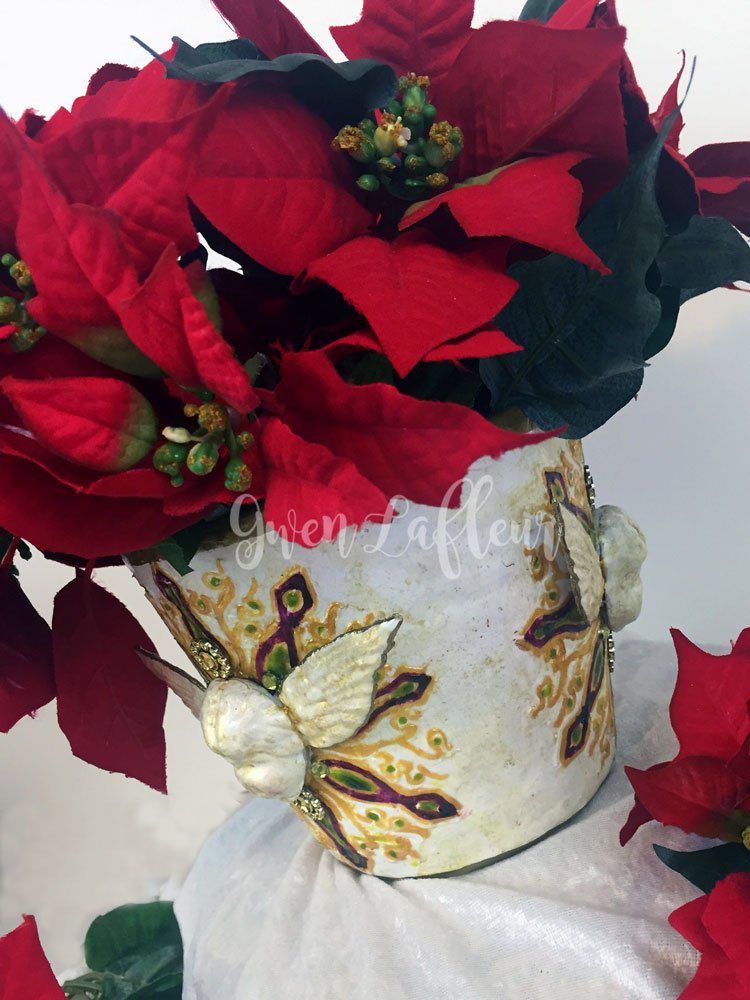
While planning this project I was chatting with my mother (we have similar taste in decor,) and she reminded me of a ceramic planter that a friend of hers had made for her that she uses for poinsettias. I've always loved it because you can take off the foil wrapper that they come in and put it in a much more attractive vessel. I thought it would be fun to try and make something similar for my own house; I had a feeling that using irRESISTible sprays and Pico Embellishers from Imagine Crafts would work perfectly for giving me a glassy, ceramic-esque finish. As I worked on both pieces, I took photos of the process and I have overviews of each below. Of course, you could take these techniques and adapt them to work with your own taste - use the patterns, motifs, and colors that appeal to you! |
|
The first thing I did was to create two molds and do some casting with clay in order to make my cherubs. I had a nice sized vintage Frozen Charlotte head, so I made a mold of that using a silicon mold kit from Amazing Casting Products and then used that half along with Aves Apoxie Clay to make "cherub" faces. I also had a set of vintage metal wings and I made a mold of those and then made several sets of clay wings.
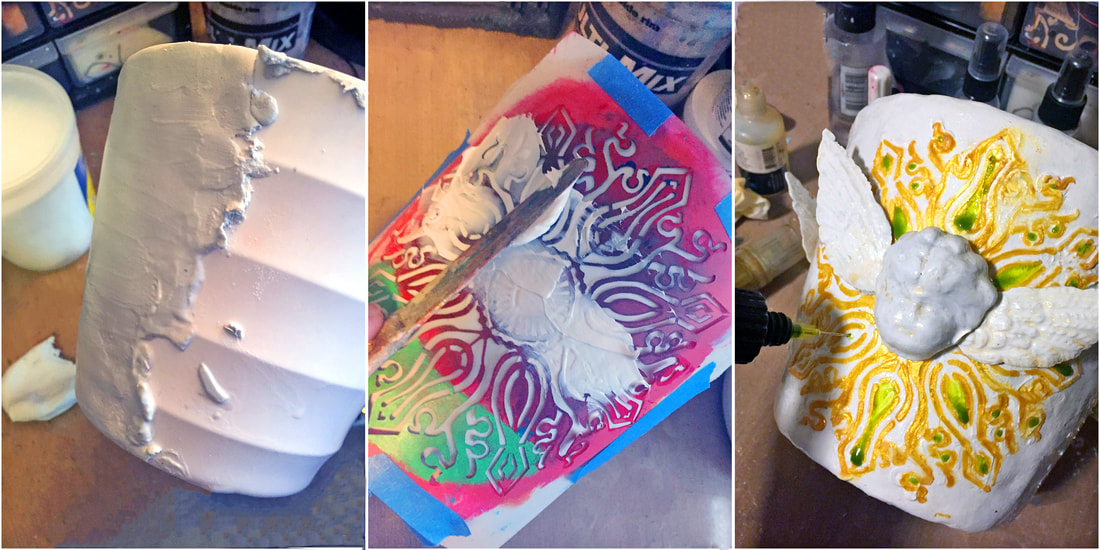
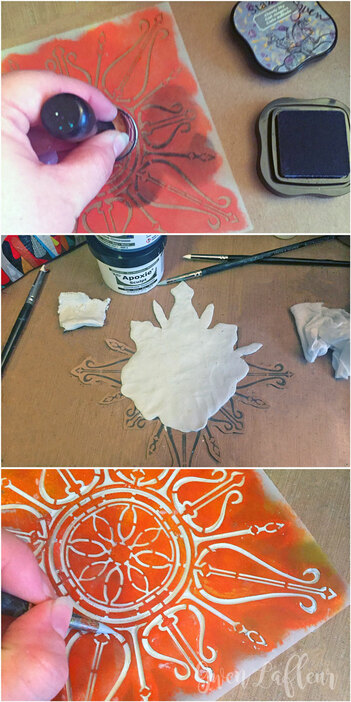
While those pieces were curing, I worked on getting my pot ready to go. I bought an inexpensive 6" plastic pot and took some lightweight epoxy clay that I used to cover the entire pot - I kept the layer quite thin... about 1/8" or a bit more. Depending on what kind of pot you have and how you want the finished product to look, you could skip this step. I wanted to even out the ridges on the outside of the pot and also create a surface that would take paints and glazes and help give me the faux ceramic finish I was looking for. (The far left photo below.) |
When the clay was completely cured (I let it go overnight,) I took my Decorative Medallion Stencil and spread texture paste through the opening. I let it set until it was dry to the touch and then moved the stencil to do it again. I repeated that until I had 3 medallions, spaced fairly equally around the pot. I had originally planned to make an all-white pot but decided to bring in some color, so I took the Imagine Crafts Creative Medium in gold and added another layer on top of the dried white texture paste. (You could obviously just do that the first time if you know from the start that you want a different color. You can also tint white texture paste with paints or pigment powders.)
Once all of the texture pastes were dry, I used more apoxy clay to put the cherub heads and wings on the pot. I positioned them and then let them cure for a few hours so that they wouldn't move for the next step. For that, I used my irRESISTible Pico Embellishers in Pear Tart and Lilac Posies to add some color into some of the openings in the stencil design. (I like to design my stencils so that you can color in the spaces, which you can do with lots of different mediums.)
Once all of the texture pastes were dry, I used more apoxy clay to put the cherub heads and wings on the pot. I positioned them and then let them cure for a few hours so that they wouldn't move for the next step. For that, I used my irRESISTible Pico Embellishers in Pear Tart and Lilac Posies to add some color into some of the openings in the stencil design. (I like to design my stencils so that you can color in the spaces, which you can do with lots of different mediums.)
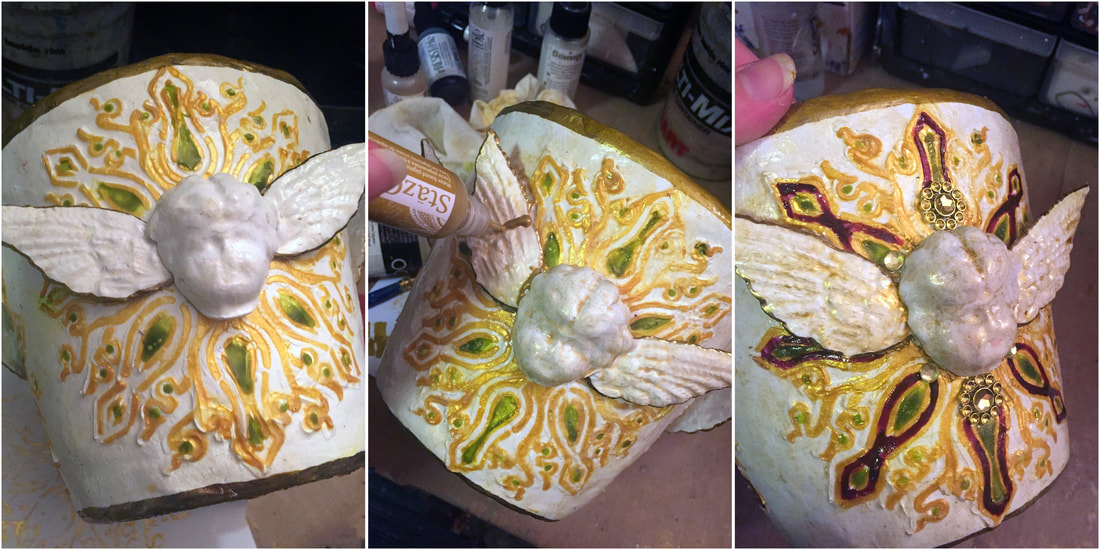
In the photos below you can see that I took gold paint pens and added borders on the top and bottom of the pot, as well as around the wings of each cherub.
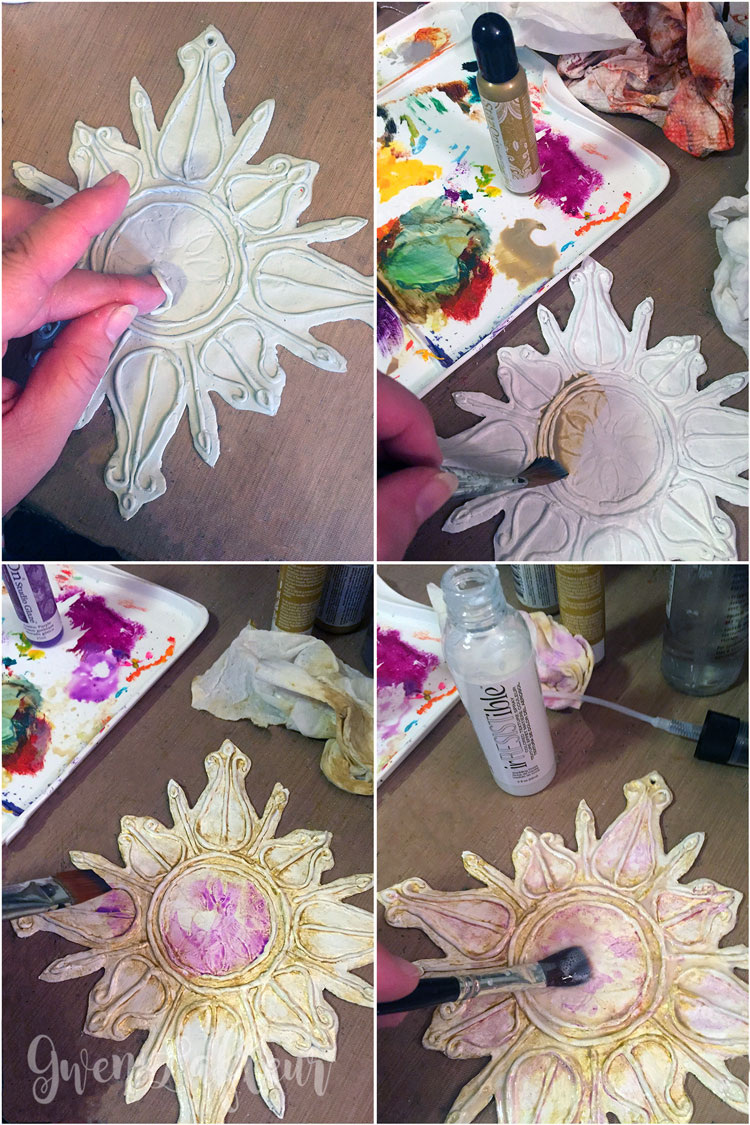
To add a bit more depth to my molded pieces I used StazOn Studio Glaze in gold and put that all over the cherub face and wings and the textured stenciled area. I let it dry for a minute and then used a baby wipe to wipe some of it off - it leaves hints of gold in the nooks and crannies. (This was the point where I decided to add the purple glaze into the stenciled area - you can see that in the 3rd photo above.)
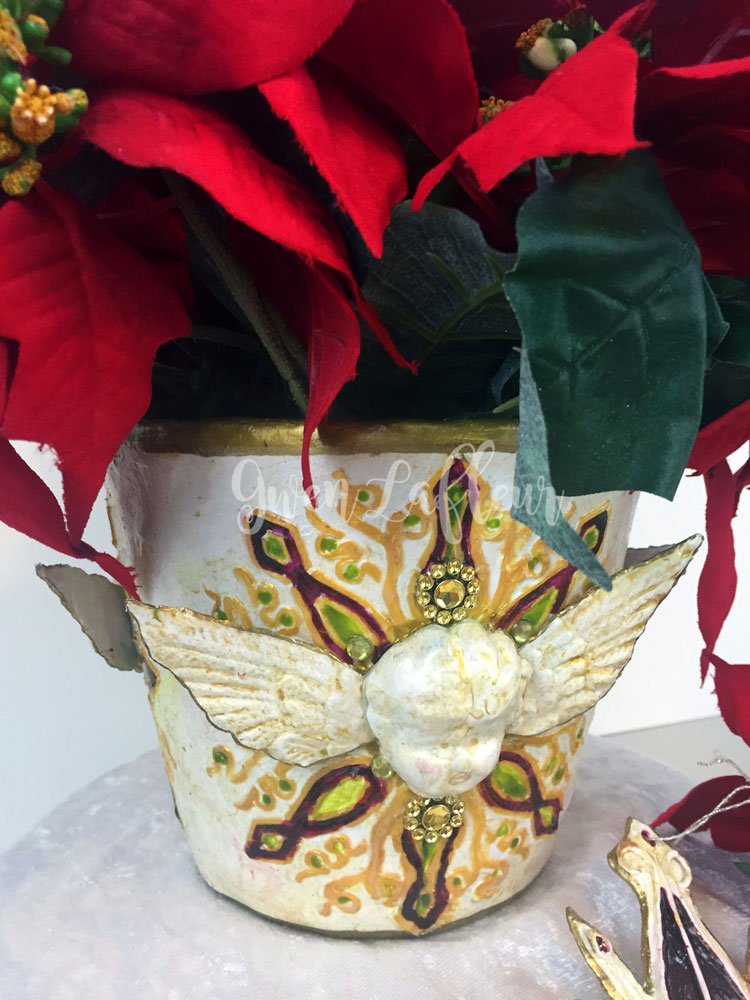
After that, I took my irRESISTible Texture Spray in Wedding Dress, took off the sprayer and used it with a brush to put a heavy glaze of transparent white all over the whole piece. This is the step that really helps everything to look more like ceramic. I left that to dry, then added some faux jewels around each medallion.
Here you can see a few more views of how the planter turned out after everything was dried:
Of course you don't have to use clay at all if you want to make your own pot - you could take a plain pot (terracotta would work great) and just paint it white, then stencil on top of it and add the glazes. For the embellishment you could use ready made cherub ornaments or find something else entirely.
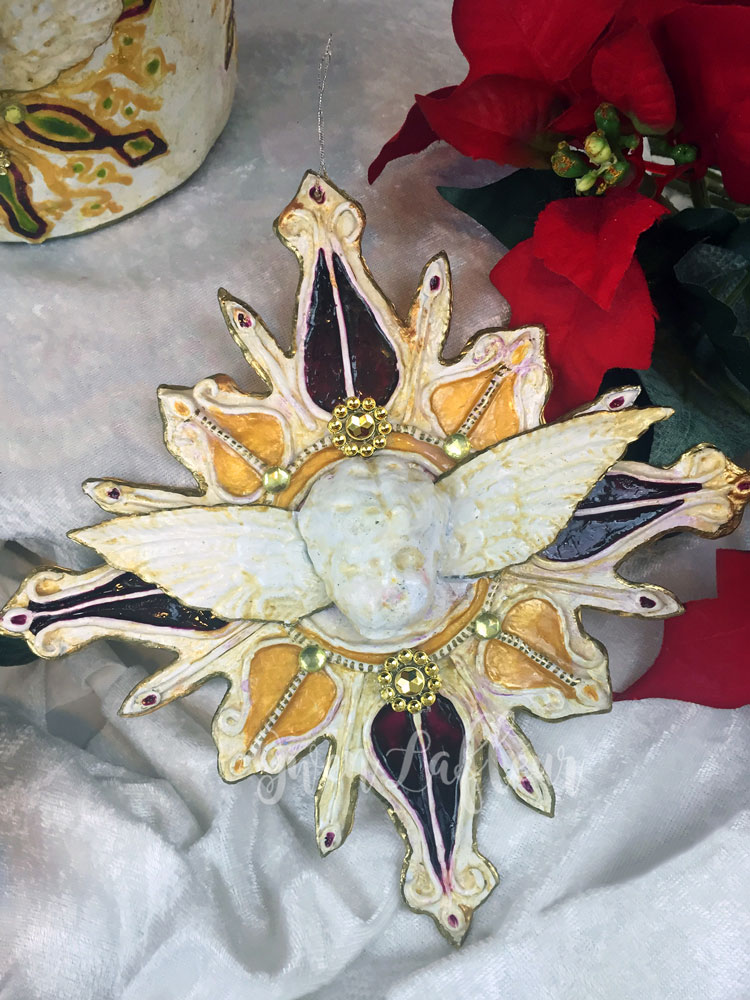
The second tutorial is for the faux ceramic Christmas ornament - this ended up being my favorite of the two projects.
|
To start, I stenciled my Decorative Curvy Ornament stencil onto a sheet of thin chipboard and then cut around the design. Next, I took some Aves Apoxie Clay and covered the whole piece of chipboard in clay, carefully working around the details of the design and making sure the clay covered the sides of the chipboard.
Before the clay was cured, I lined my stencil back up with the shape and used a rubber color shaper tool to trace the design into the clay. After that was done, I mixed up some more clay and rolled it out into long, thin ropes and used it to outline the traced areas so that the details would be raised up from the base. (This part is definitely tedious, but I think the added detail is really worth it in the end.)
Note that I put the hole through what was going to be the top of the ornament while the clay was still soft. I also turned it so that it looked more like a 4-point star. |
I let the clay cure overnight and then I used the StazOn Studio Glaze in gold and then again in purple to glaze the ornament.
For the first layer of each color, I mixed the glaze with water and applied it all over with a brush, waited a minute or so to let it dry just a bit, then wiped some of the glaze back off with a baby wipe. Then I went in with the undiluted glaze and added some more directly into the nooks and crannies for added contrast.
I started with gold and when it was dry I repeated that process with the purple glaze. When both layers of color were dry I used the irRESISTible Texture Spray in Wedding Dress for a thick coat of transparent white glaze. This, combined with the colored glazes below it really transformed the look of the piece.
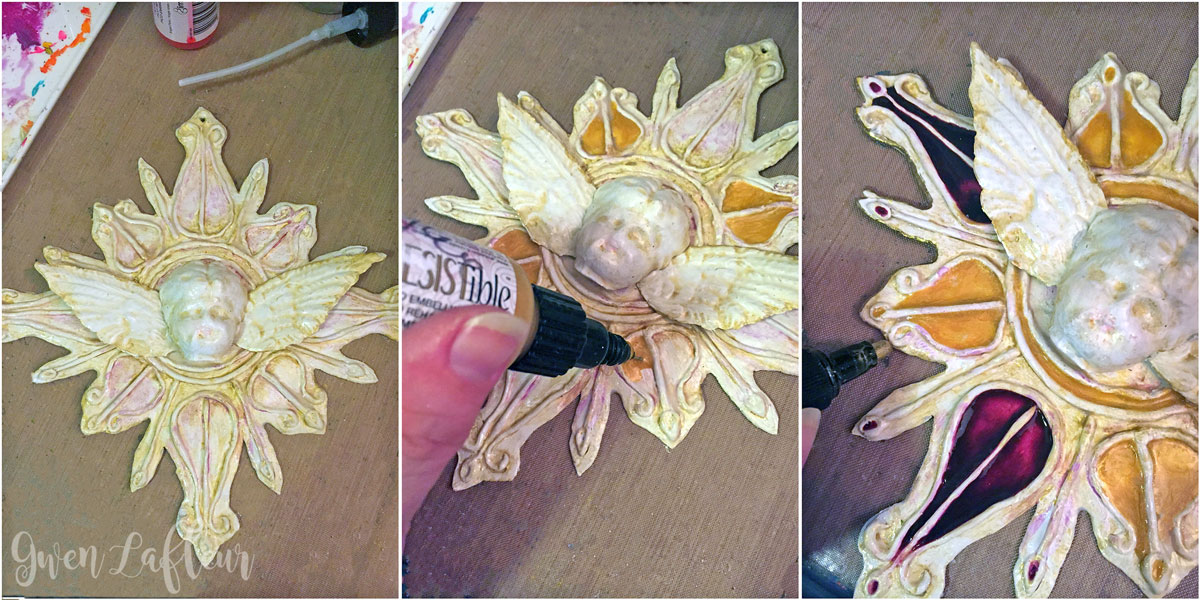
Next, I used more clay to adhere the face and wings onto the ornament and let that cure for a few hours so that I wouldn't disturb the placement when I went back to add more color and details.
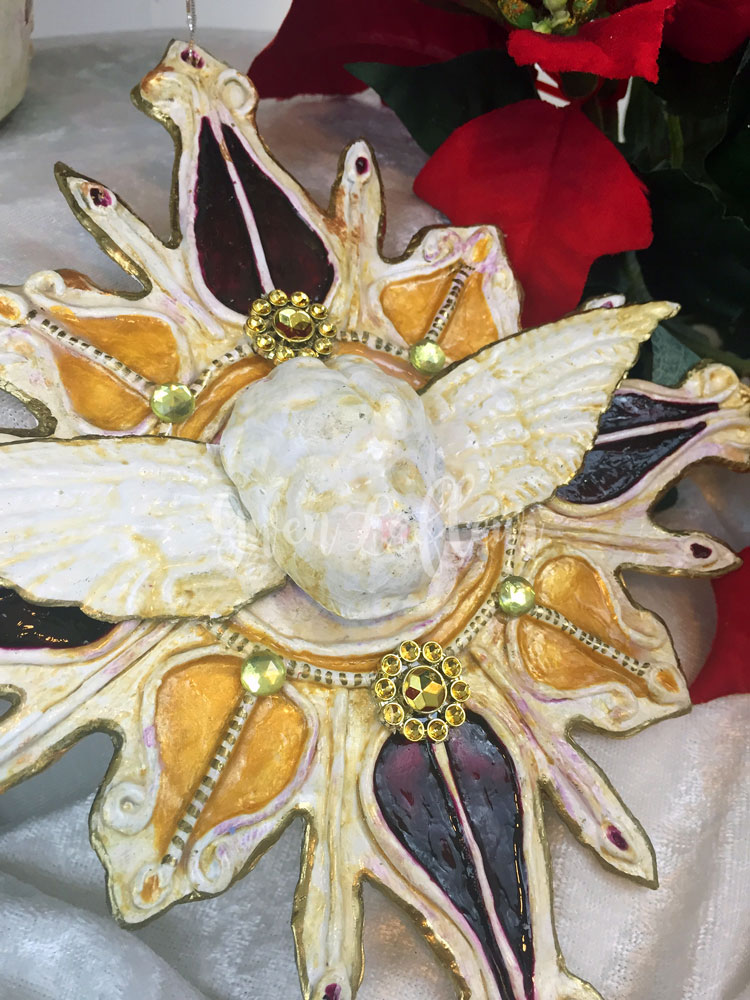
When the clay was cured enough for me to continue working I used irRESISTible Pico Embellishers in gold and Lilac Posies to flood the insides of some of the raised detail areas. I've always thought that the irRESISTible products looked a lot like stained glass because they're fairly translucent and shiny when dry - I think the look you get from them here is really cool.
From there I just needed to add a few finishing touches. I outlined everything with a gold paint pen, added gold stripes to some of the clay lines in the design, and added a few faux jewels. You can't see it here, but I also gessoed the flat back side of the ornament and then painted it gold.
From there I just needed to add a few finishing touches. I outlined everything with a gold paint pen, added gold stripes to some of the clay lines in the design, and added a few faux jewels. You can't see it here, but I also gessoed the flat back side of the ornament and then painted it gold.
It does take a fair amount of work and time to follow this process, but I thought it was worth it to have something so completely custom and reflective of my own personality to add to my holiday decor.
You might also like...

