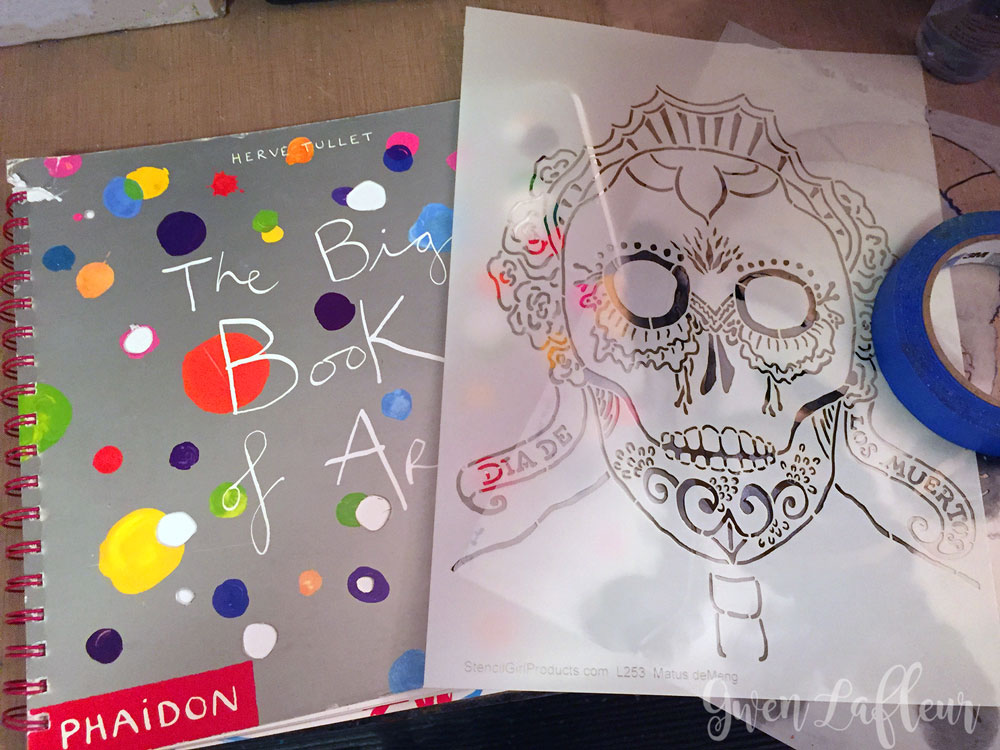
I love the artwork and stencil designs by Andrea Matus deMeng, especially the way she designed her stencils to work together. For this project I focused on using her Dia de los Muertos stencil along with one of her face stencils. I have to admit that I had passed on this design at first, but once I realized all of the different ways I could use it, I couldn't get my hands on it fast enough!
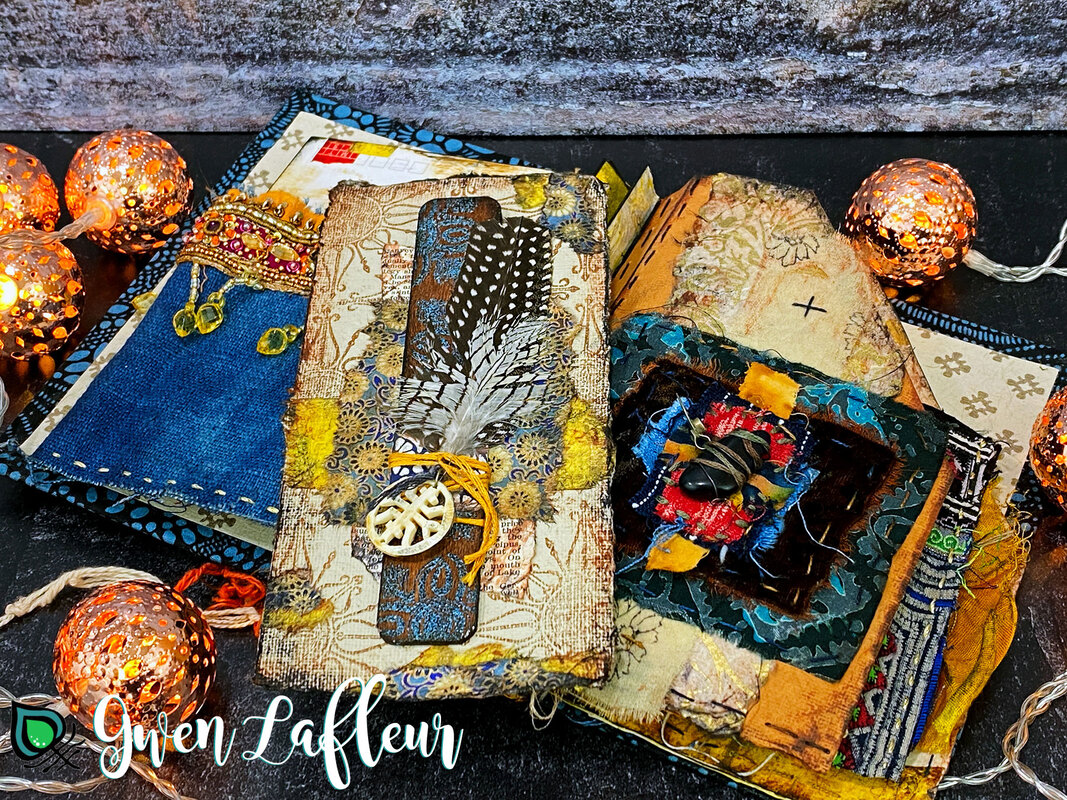
For this project, I wanted to try something fun and different in my art journal. This isn't just a single art journal page, and I don't know if I'd call it a page either...
Do you remember those fun books that you got as a kid where you could flip a section of the page to combine the images on each page into something new? (There's also an old parlor game called The Exquisite Corpse that has a similar concept.) I thought it would be fun to do a take on that idea in an art journal format.
Below you can see the first "page" in my journal as well as a peek at how the pages break to give you the ability to mix and match halves of the different pages for a variety of combinations.

|

|
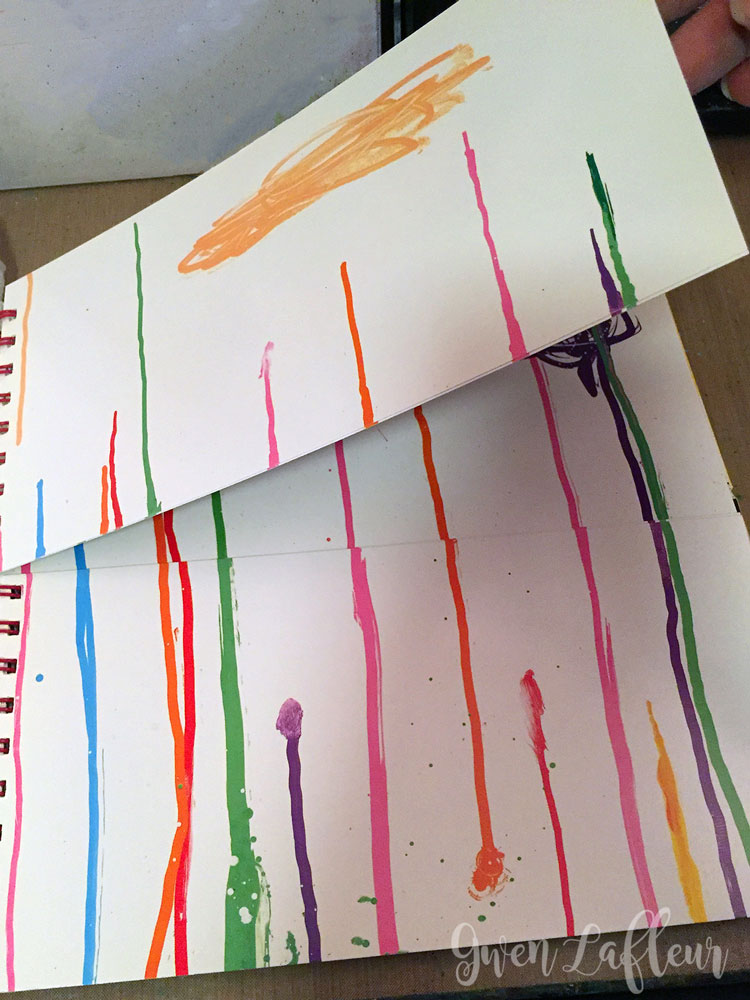
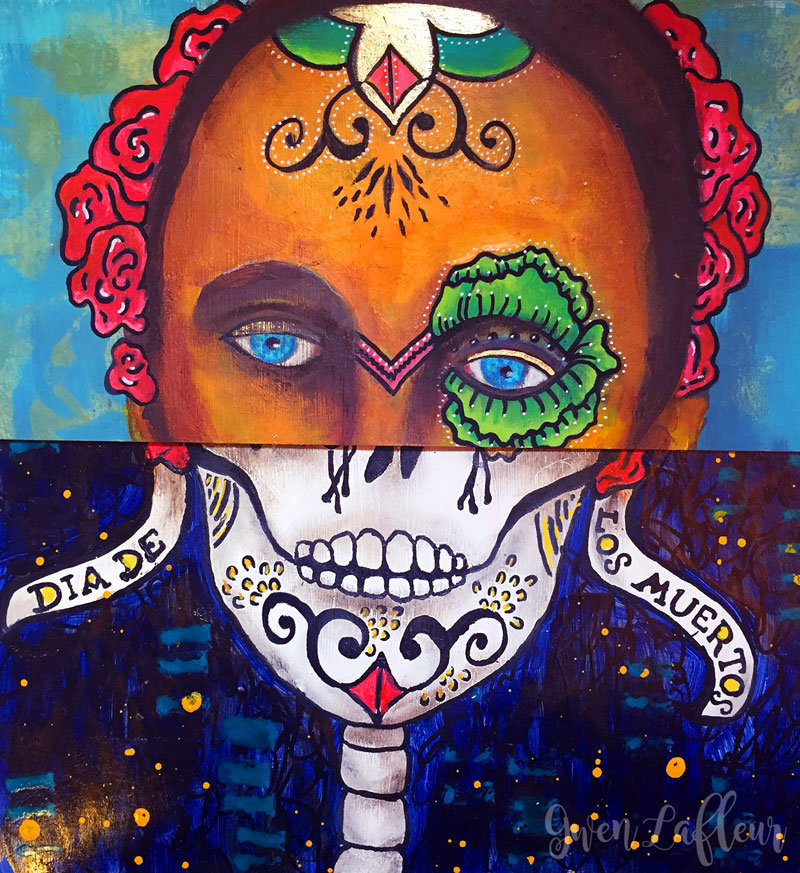
To make this book, I started with a cool art book that I'd found a few years ago on a clearance shelf in a little shop in the Denver airport; it's called The Big Book of Art. This book already had the pages split with the intent to mix and match - that's what gave me the idea to try and create my own. Of course if you don't have a book like this you can make your own by cutting sequential pages in your journal at the exact same spot. (You could also do it in three parts - that makes it function a bit more like the original Exquisite Corpse game.)
|
|
To make my art journal / flip book, I took out this book along with the Dia de los Muertes stencil and the Abigail, A Timeless Woman stencil - also by Andrea Matus deMeng. I've been lucky enough to take classes with Andrea on multiple occasions and I discovered that many of her stencils are designed to work together. Her original 9x12 face stencils (Eve, Abigail, and I believe Doris as well,) will all work with the Dia de los Muertos mask stencil (and many more of her designs.)
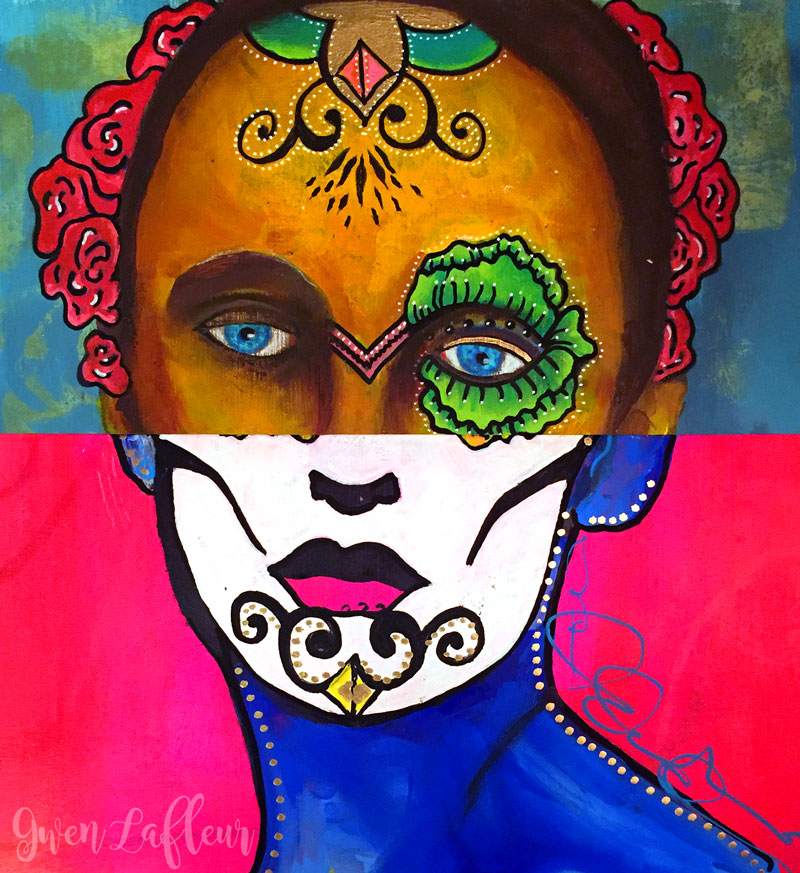
I started by using painter's tape on the back of each page to keep the two halves in place while I was working. Next I sanded the pages of the book - they were a bit glossy which can make it so that the paint doesn't stick as well. I applied a layer of gesso, adhered a variety of collage papers, and added a layer of paint. After that, I stenciled the first layer with the Abigail stencil using a dark brown paint.
I started by using painter's tape on the back of each page to keep the two halves in place while I was working. Next I sanded the pages of the book - they were a bit glossy which can make it so that the paint doesn't stick as well. I applied a layer of gesso, adhered a variety of collage papers, and added a layer of paint. After that, I stenciled the first layer with the Abigail stencil using a dark brown paint.
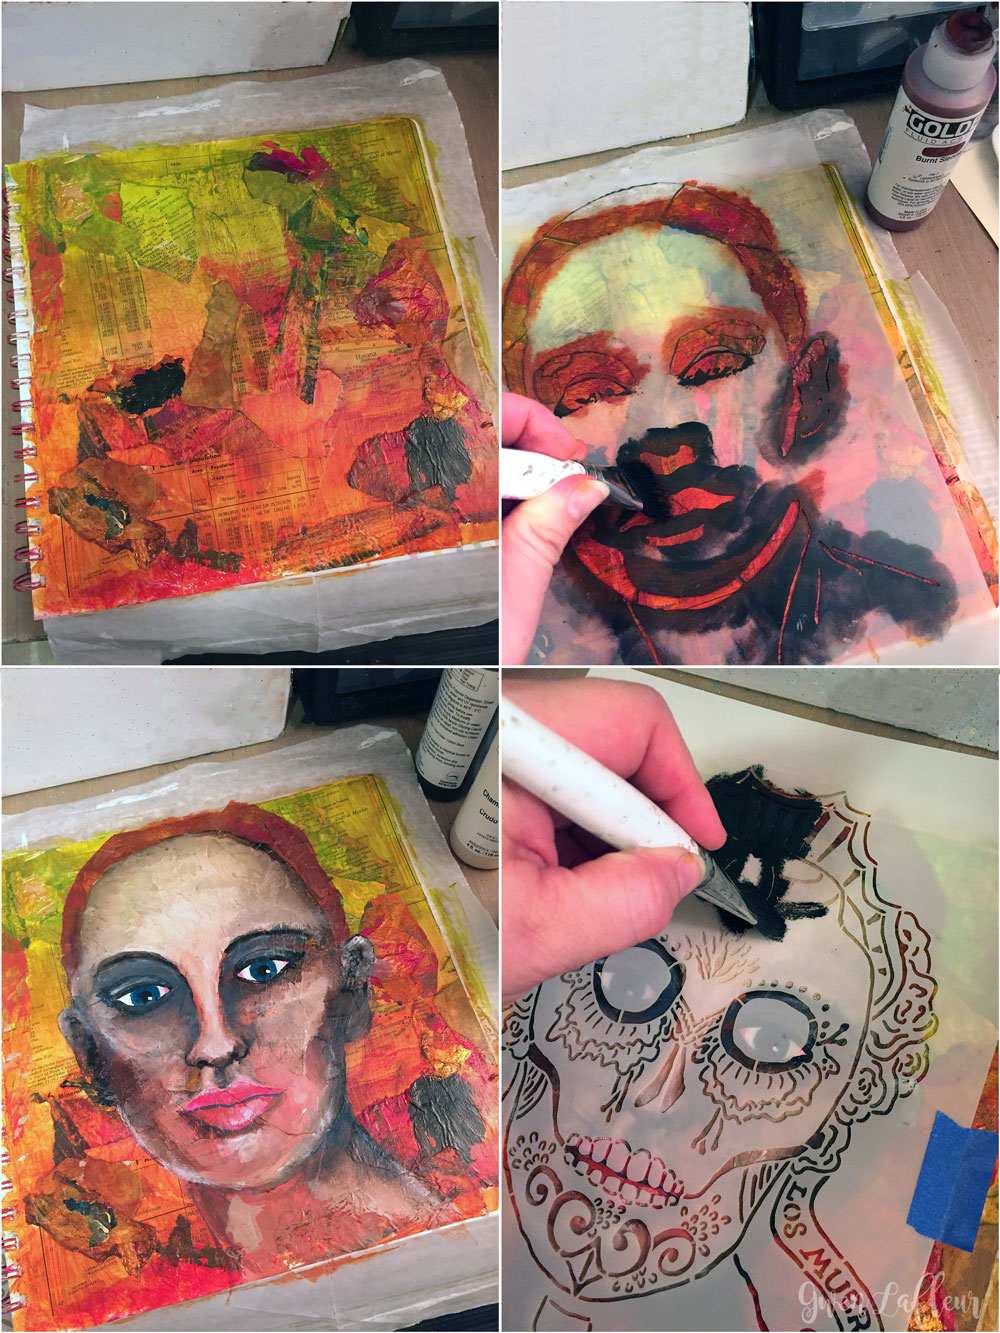
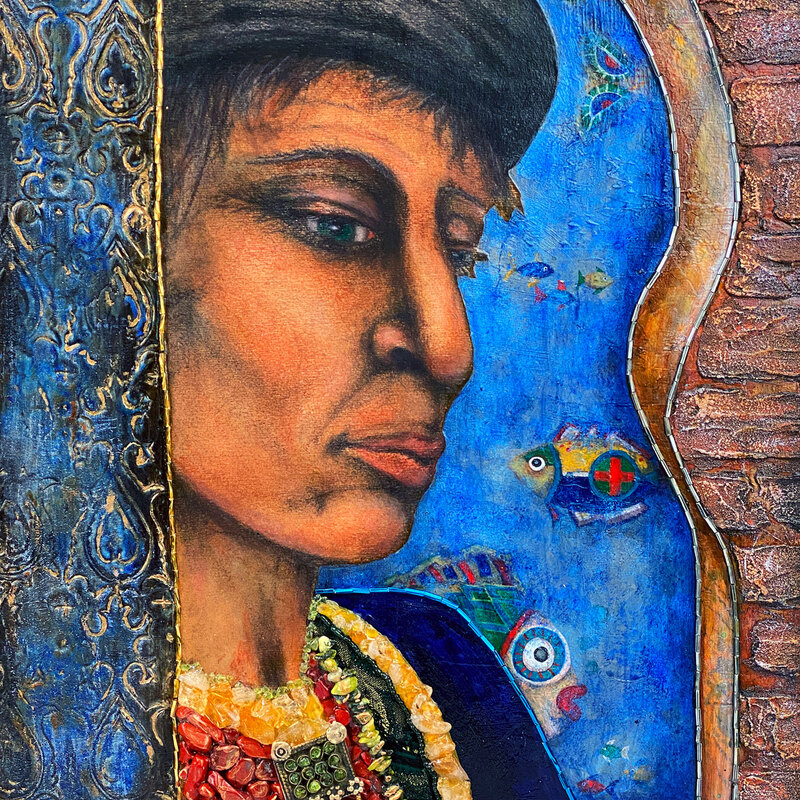
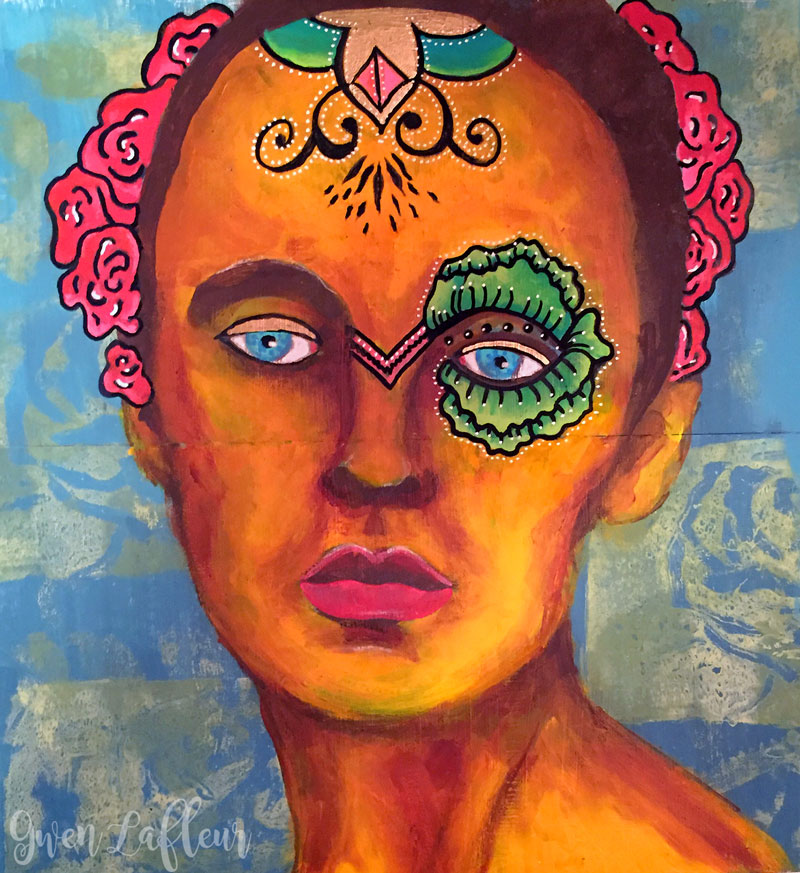
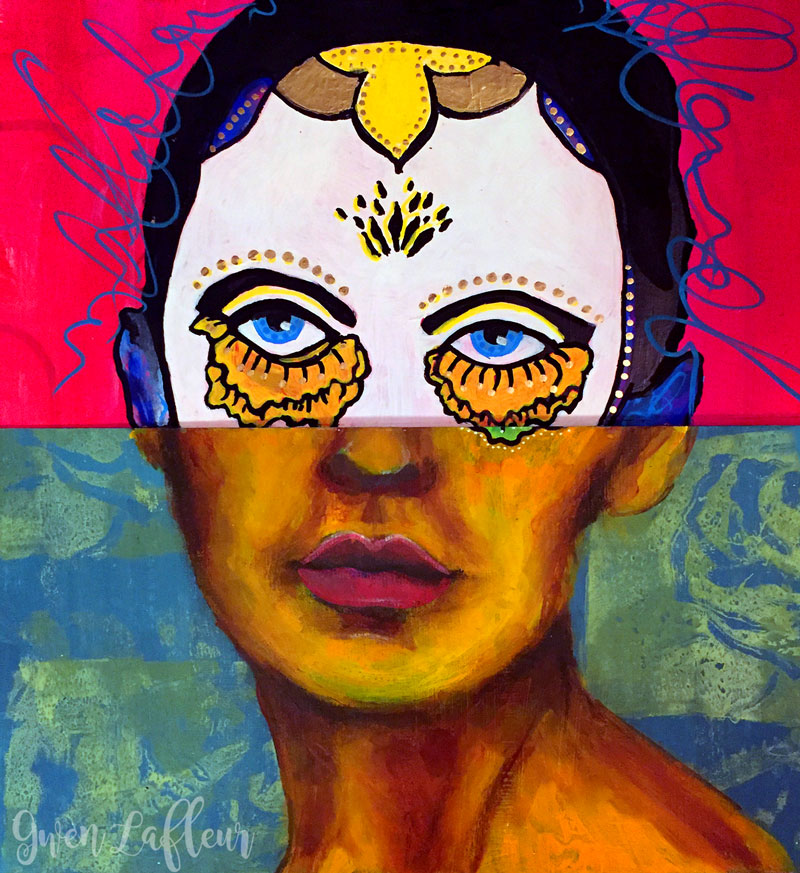
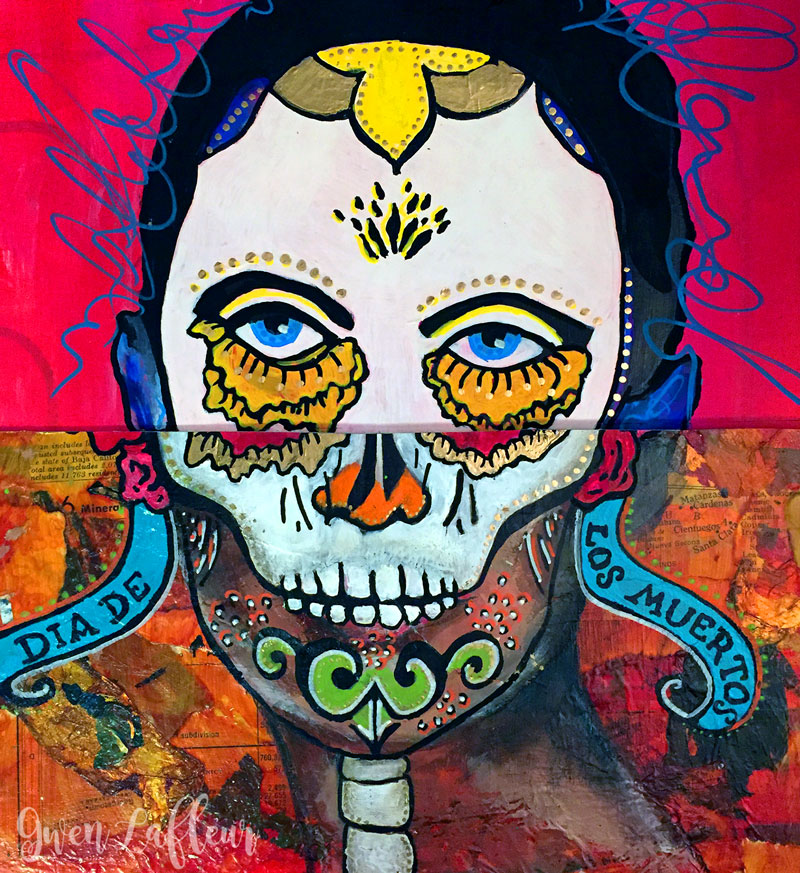
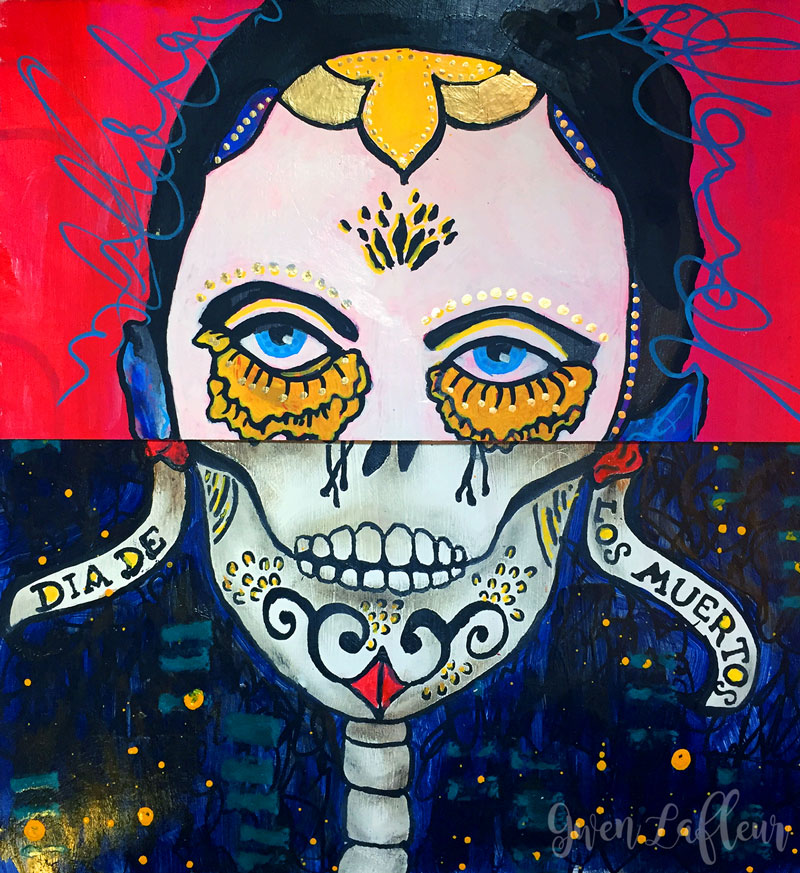
Once that was done, I continued to paint (with acrylics) and turned the stenciled face into a portrait. Finally, I used the Dia de los Muertes stencil and lined it up with the painting below before stenciling with black paint. (You can see above how easy it is to see the image on the page through the mylar stencil.)
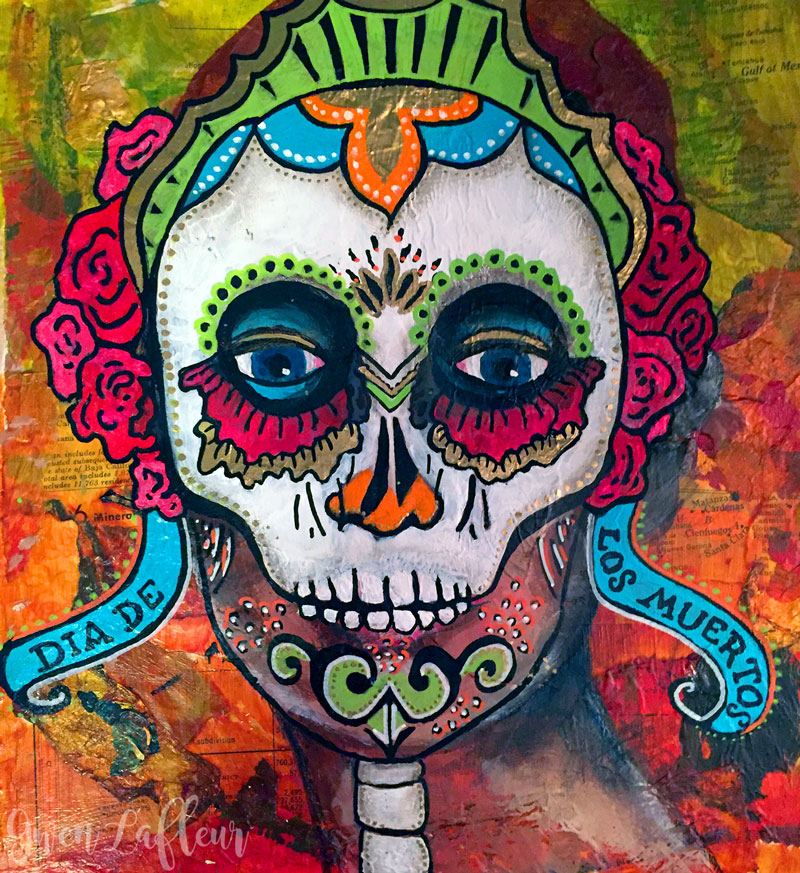
Once I had the outline of the mask in place, I looked up images of sugar skulls online for inspiration and went through and added color and detail inside of the stenciled areas.
Once I had the outline of the mask in place, I looked up images of sugar skulls online for inspiration and went through and added color and detail inside of the stenciled areas.
Of course, to make a flip book, you need more than one "page" so I repeated a similar process on the following three pages in my book. For each of those I varied the colors I chose to paint with as well as the way that I combined the stencils.
As I finished each page, I took the painter's tape off the back. For the first page where I'd collaged over it, I went back through with a ruler and an x-acto knife and re-cut the pages since the collaged parts had covered over and connected the two halves.
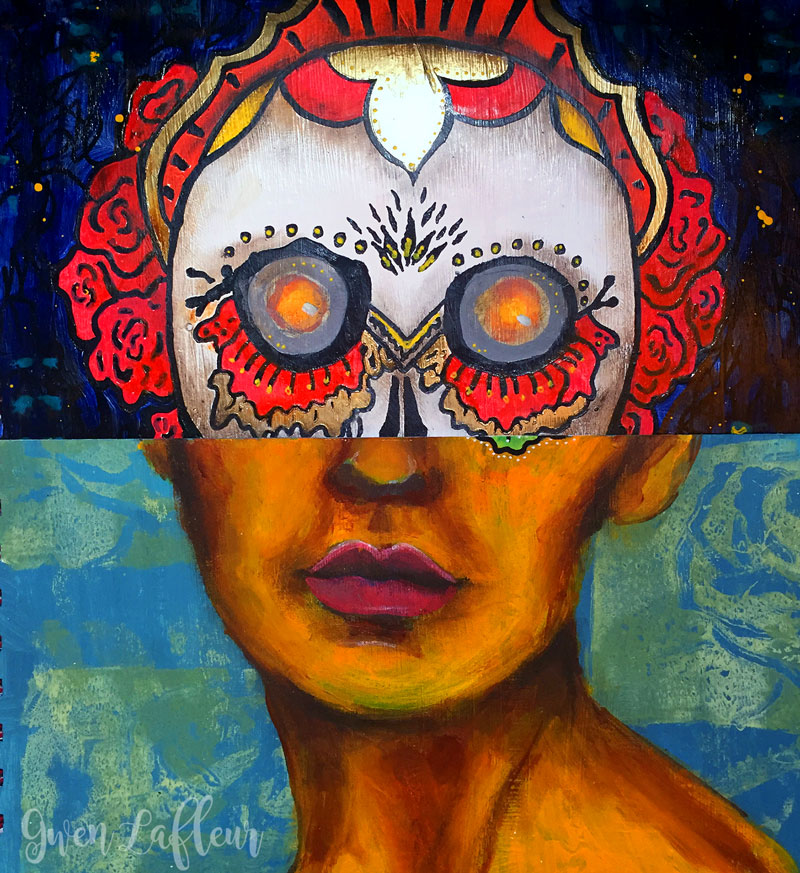
On the second page, I used Andrea's A Rose by Any Other Name stencil to do some gelatin printing with a mini square Gelli Plate. I decided to go a bit on the funky side and make her yellow.
In order to try and get the faces to line up (it didn't always turn out perfect, but it was usually pretty close!) I put half of the previous page over the new one and then use painter's tape to hold my stencil in place after I'd positioned it so that it would match.
As I finished each page, I took the painter's tape off the back. For the first page where I'd collaged over it, I went back through with a ruler and an x-acto knife and re-cut the pages since the collaged parts had covered over and connected the two halves.
On the second page, I used Andrea's A Rose by Any Other Name stencil to do some gelatin printing with a mini square Gelli Plate. I decided to go a bit on the funky side and make her yellow.
In order to try and get the faces to line up (it didn't always turn out perfect, but it was usually pretty close!) I put half of the previous page over the new one and then use painter's tape to hold my stencil in place after I'd positioned it so that it would match.
|
|
|
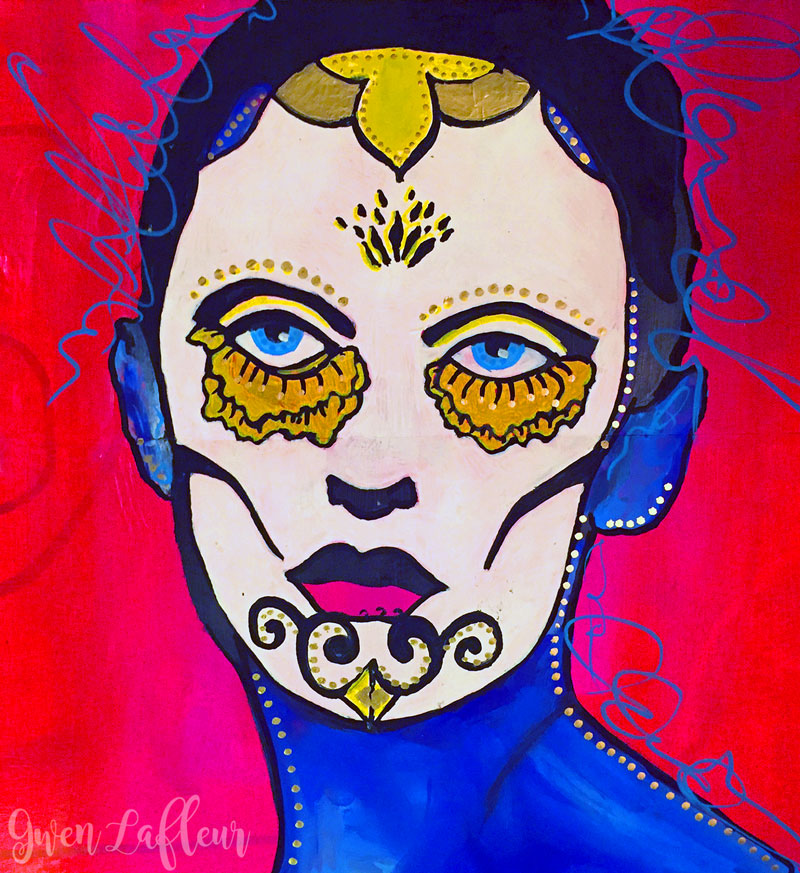
The third page was almost entirely paint - I wanted lots of brightness, contrast, and a bit more of a pop art look, so I painted the figure blue with a white face and a hot pink background.
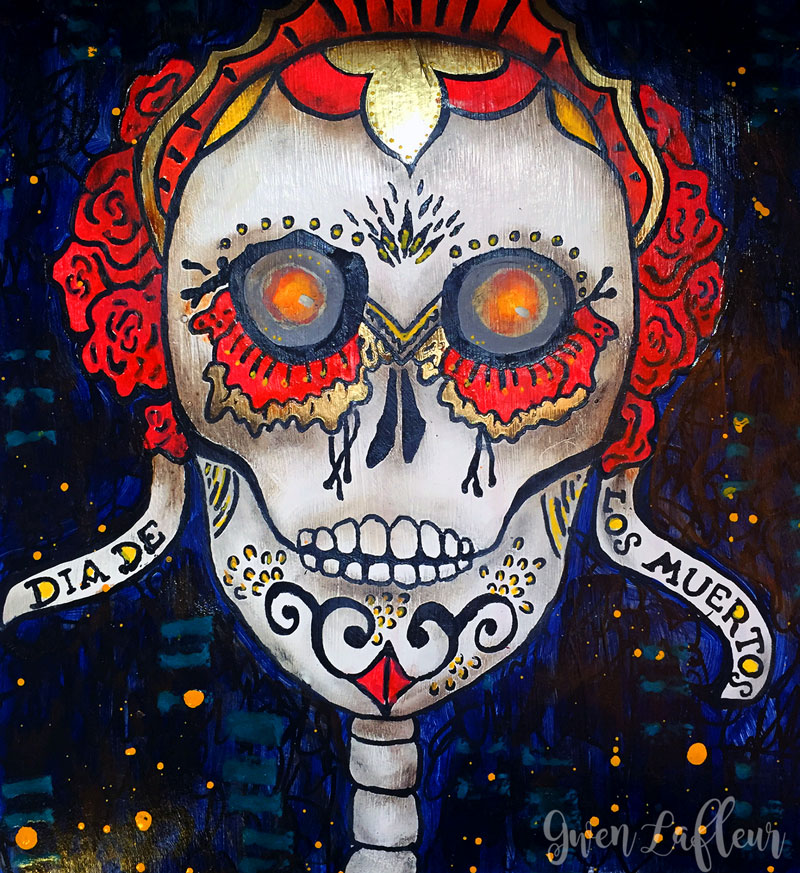
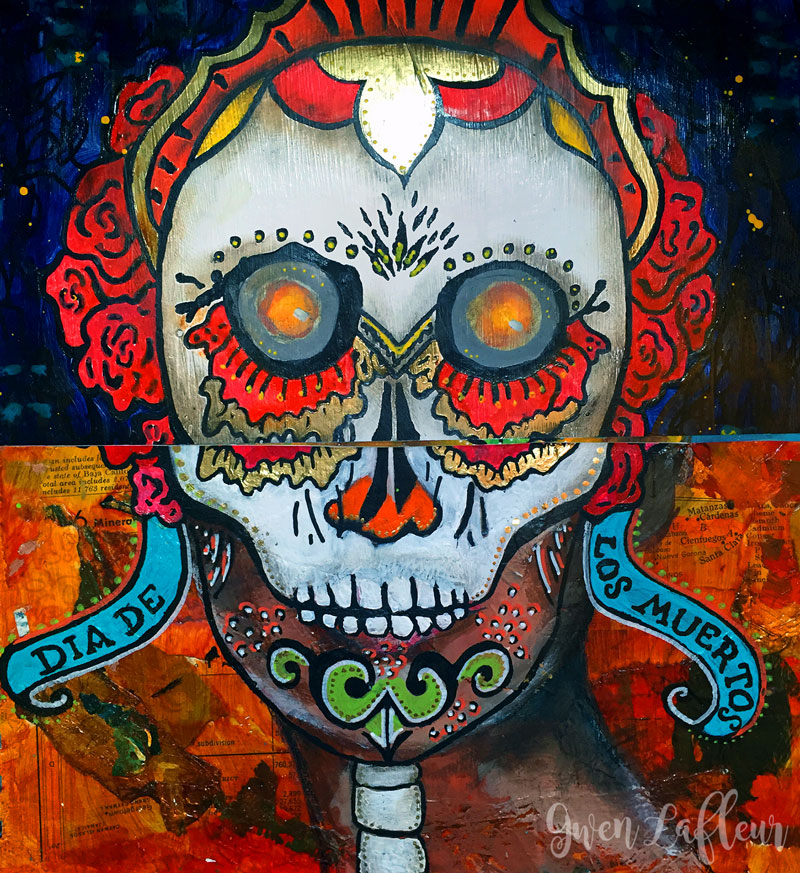
The fourth page isn't split since it's the base for the whole section. For this part I just used the mask stencil on its own to make things a bit more creepy.
With all four pages done, it was time to play! Below you can see all the different combinations I was able to get by combining the halves of the pages. (Click on any of the images to see the whole thing.)
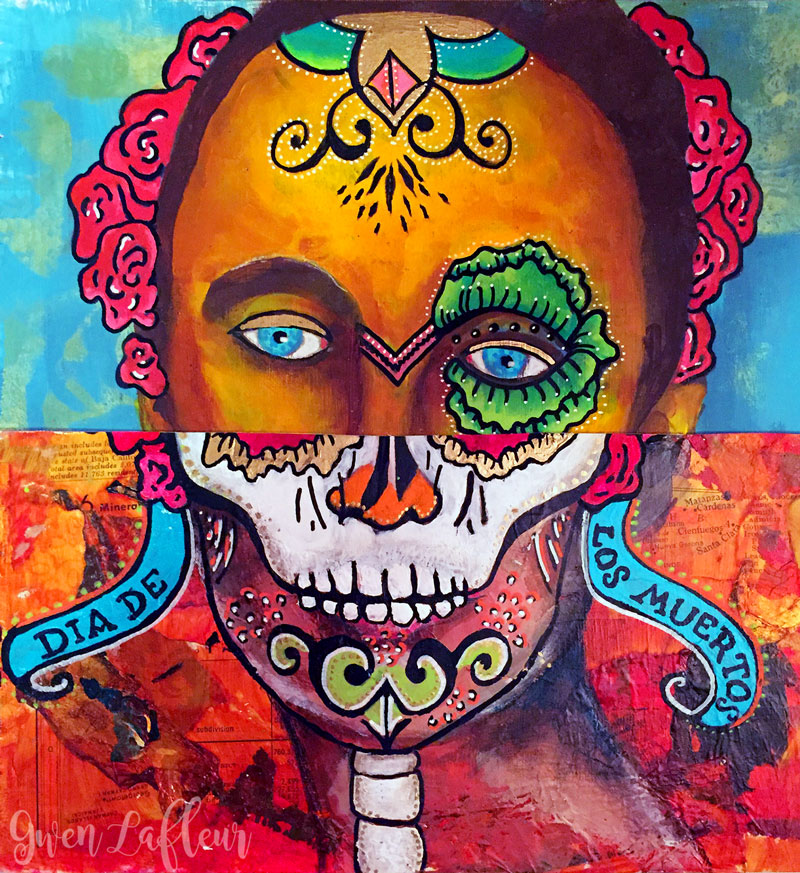


While not all of them lined up perfectly, on the whole it turned out better than expected! This would be a lot of fun to do again, only maybe using a different variety of shapes and figures on each page or more than two sections for even crazier mash-ups.