I love embossing powder. Love it. So in December 2017 when the StencilGirl team did a blog hop with Emerald Creek (who makes my absolute favorite embossing powder,) I may have jumped up and down a little in excitement. (On the inside, at least.)
I started heat embossing twenty or more years ago as I dabbled in other crafts, but while my interests have evolved my love of embossing has remained. I never get tired of watching that powder melt and in recent years I've found a few ways to make it even more fun to use.
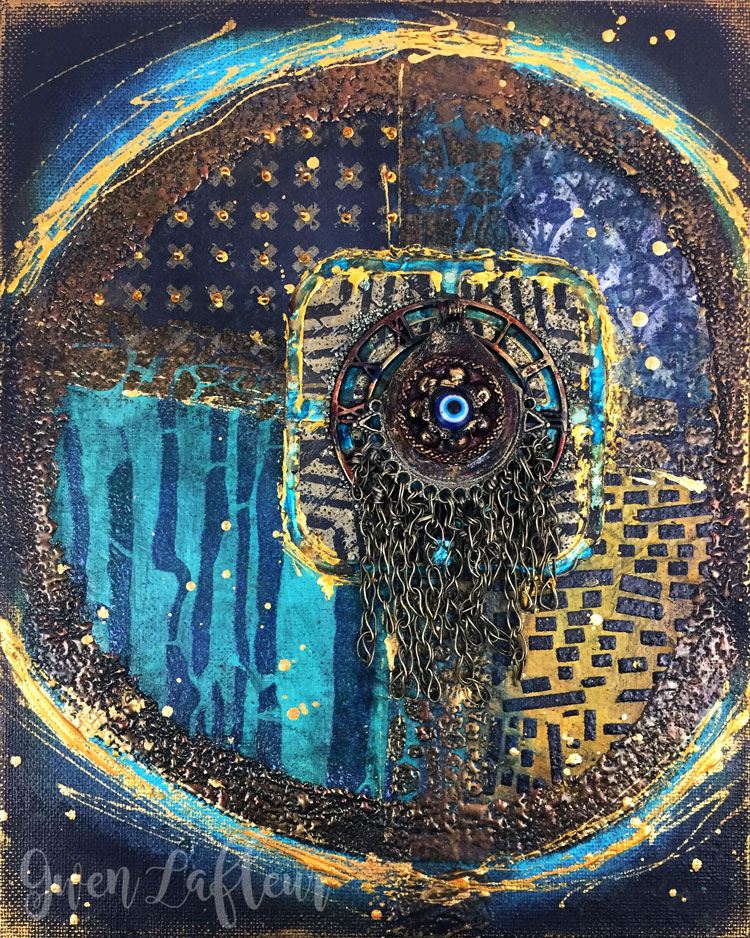
I've mixed a few of my favorite techniques together in today's project, which is an 8" x 10" abstract mixed media piece called "Eye of the Storm" which uses lots of embossing powder and stencils.
I started heat embossing twenty or more years ago as I dabbled in other crafts, but while my interests have evolved my love of embossing has remained. I never get tired of watching that powder melt and in recent years I've found a few ways to make it even more fun to use.
I've mixed a few of my favorite techniques together in today's project, which is an 8" x 10" abstract mixed media piece called "Eye of the Storm" which uses lots of embossing powder and stencils.
As I created this piece, I put together a tutorial to demonstrate how I used the various products in this piece... hopefully you'll give it a try yourself!
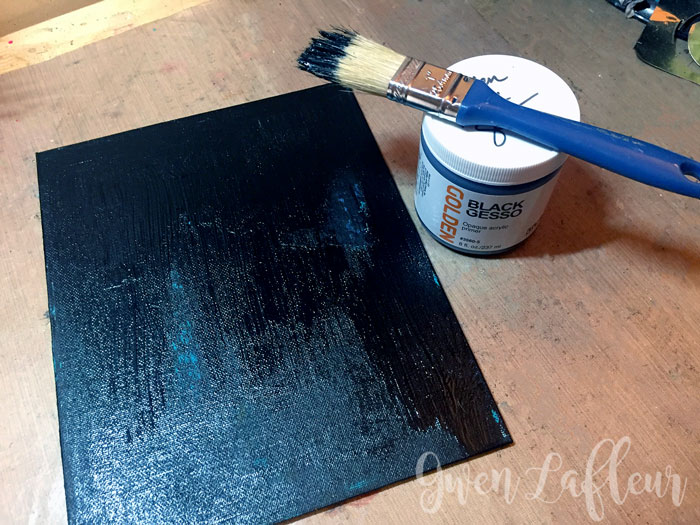
To start, I took a plain 8" x 10" canvas panel (1/4" thick) and coated it with black gesso.
To start, I took a plain 8" x 10" canvas panel (1/4" thick) and coated it with black gesso.
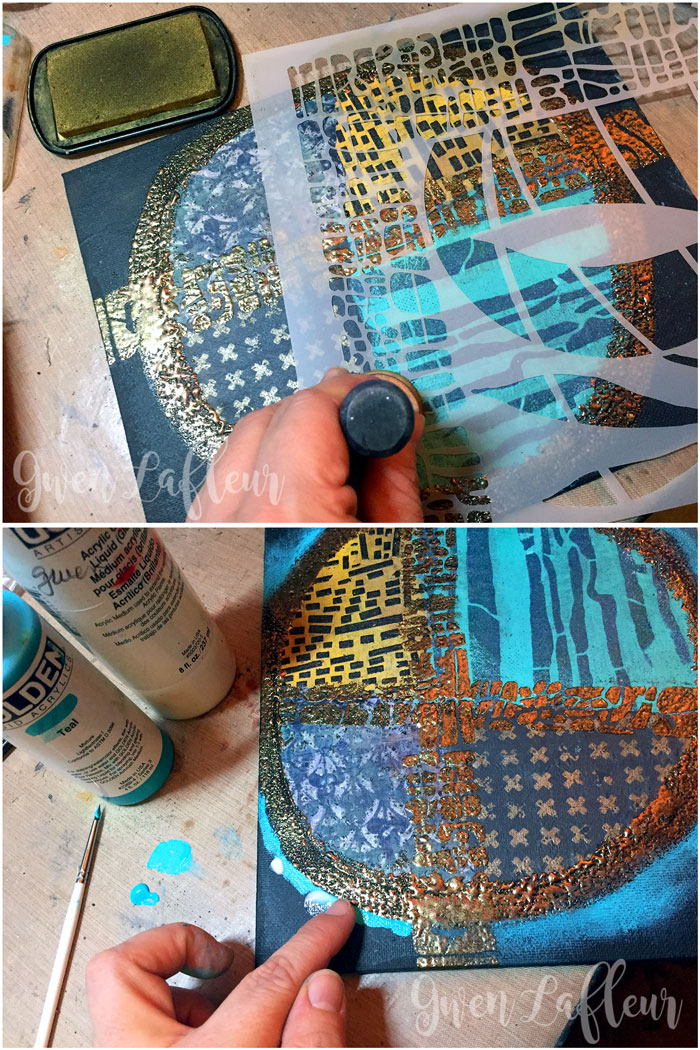
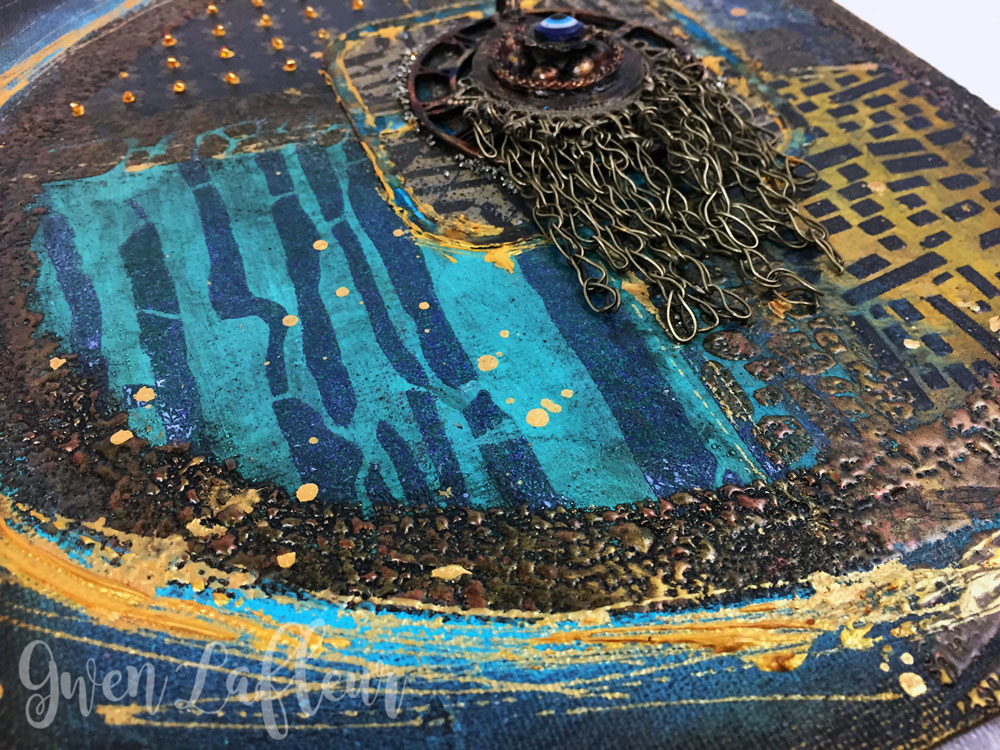
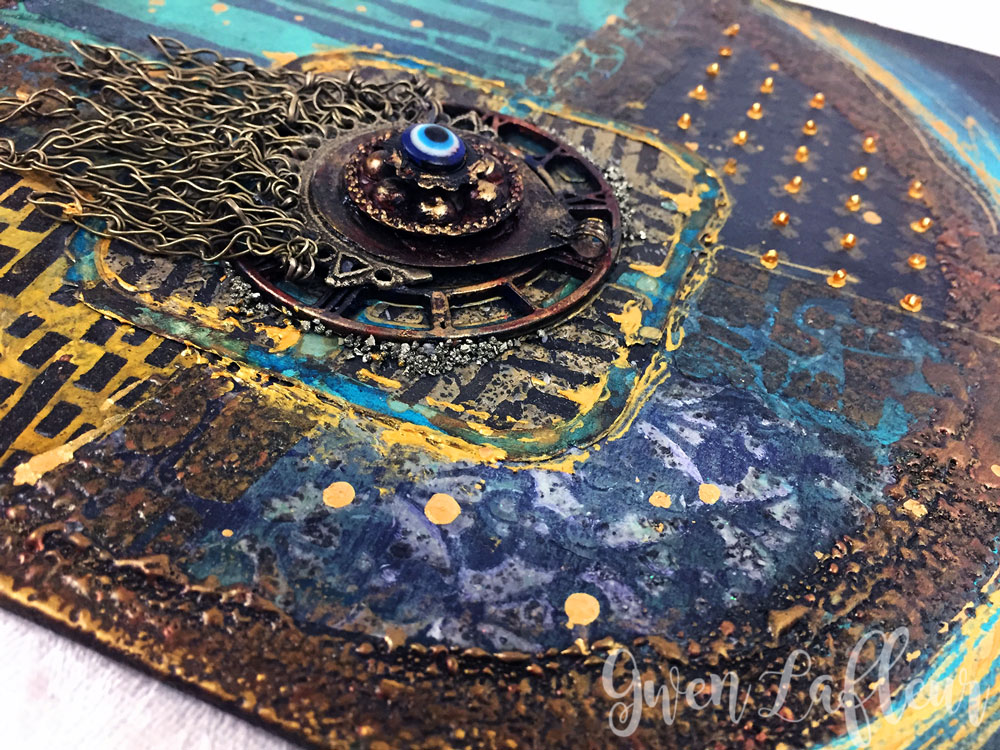
I set that aside to dry and pulled out a few sheets of deli paper that had some paint on them and not much else. I formed my color palette as I looked through what I had that was already painted and ended up with yellow, teal, dark gray, and a kind of blend of all of the colors with a bit of stenciling already on it. I pulled out a few different stencils, inked through them with a foam applicator and pigment ink, then applied the embossing powder and heat embossed the designs.
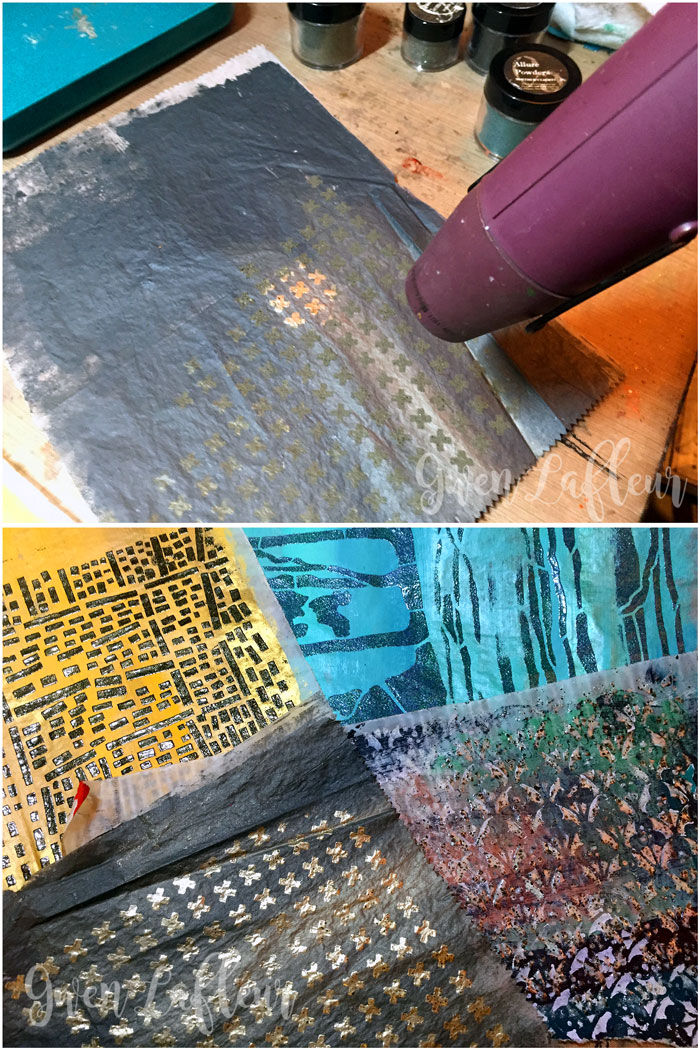
I used the X Rows stencil by Michelle Ward along with Mirror Gold embossing powder, my Ornamental Floral Screen stencil with some Fractured Ice Embossing Crystals, and two StencilClub stencils by Mary Beth Shaw: the one on yellow is the 6x6 from the April 2016 StencilClub collection used with Oil Rubbed Bronze EP, and the one on teal is the 9x12 from the January 2016 StencilClub kit along with Northern Lights EP.
I wanted to have each paper be roughly one quarter of a wonky circle, so I made a template from a piece of copy paper and used it to cut the pieces I wanted from my embossed deli paper, then adhered them onto the panel with matte medium. When collaged, deli paper wants to wrinkle much more than regular paper - sometimes I want that look and let it happen, but here I wanted it smooth so I used an old hotel room key and scraped it over the top to force out all of the bubbles.
I wanted to have each paper be roughly one quarter of a wonky circle, so I made a template from a piece of copy paper and used it to cut the pieces I wanted from my embossed deli paper, then adhered them onto the panel with matte medium. When collaged, deli paper wants to wrinkle much more than regular paper - sometimes I want that look and let it happen, but here I wanted it smooth so I used an old hotel room key and scraped it over the top to force out all of the bubbles.
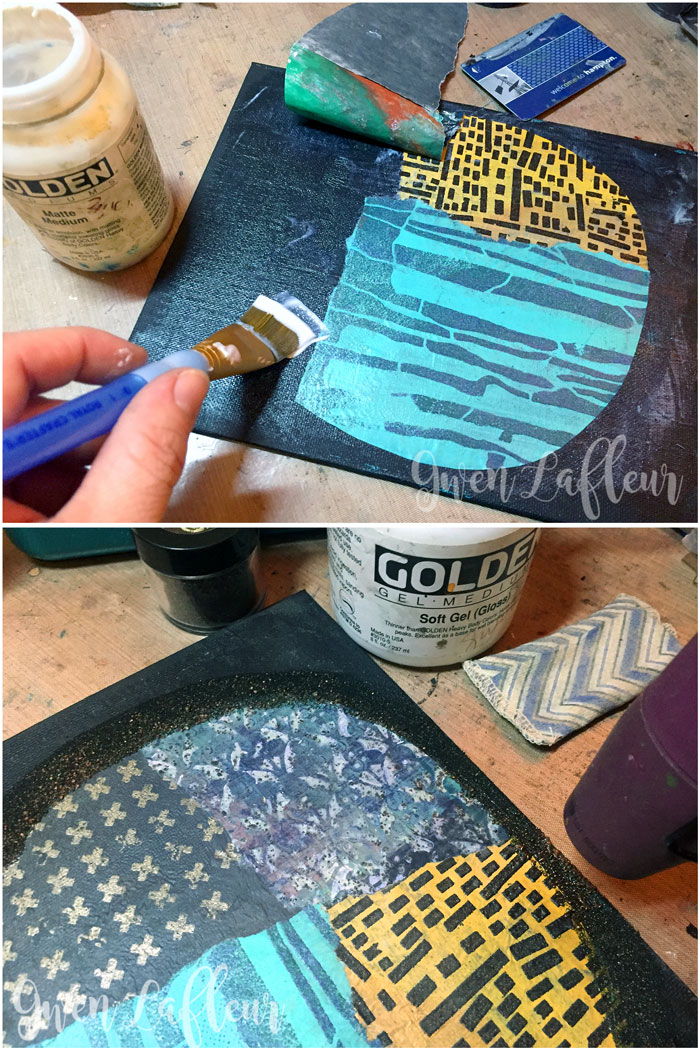
I let the panel dry thoroughly at that point since I was going to add more embossing powder, which would stick to anything that was still wet. Once dry, I used some soft gel medium and painted a thick outline around my circle of patterned papers, then used Charred Gold EP on that. I did not let that dry - if you melt embossing powder on a wet acrylic medium, it will bubble... and I love to make it bubble. (However, it will also create some not-so-lovely fumes - protect your nose and mouth or even better, use a respirator while doing this - especially for extended periods of time.) You have to be careful that you don't burn it, but this process makes a really fabulous texture in your work.
With the circle done, I got out the Verdant Moon stencil by Carol Wiebe and used gold pigment ink to stencil parts of the border designs into a slightly skewed cruciform over the seams of my papers. I embossed that with more Charred Gold EP.
With the circle done, I got out the Verdant Moon stencil by Carol Wiebe and used gold pigment ink to stencil parts of the border designs into a slightly skewed cruciform over the seams of my papers. I embossed that with more Charred Gold EP.
To create a bit of a halo effect around the circle, I just used some teal fluid acrylic paint along with acrylic glazing medium and my finger and spread the paint around the edge of the embossed circle.
Next, I glazed the patterned sections with gray, then used some gold paint in a Fineliner bottle to scribble an echo of the embossed circle.
Next, I glazed the patterned sections with gray, then used some gold paint in a Fineliner bottle to scribble an echo of the embossed circle.
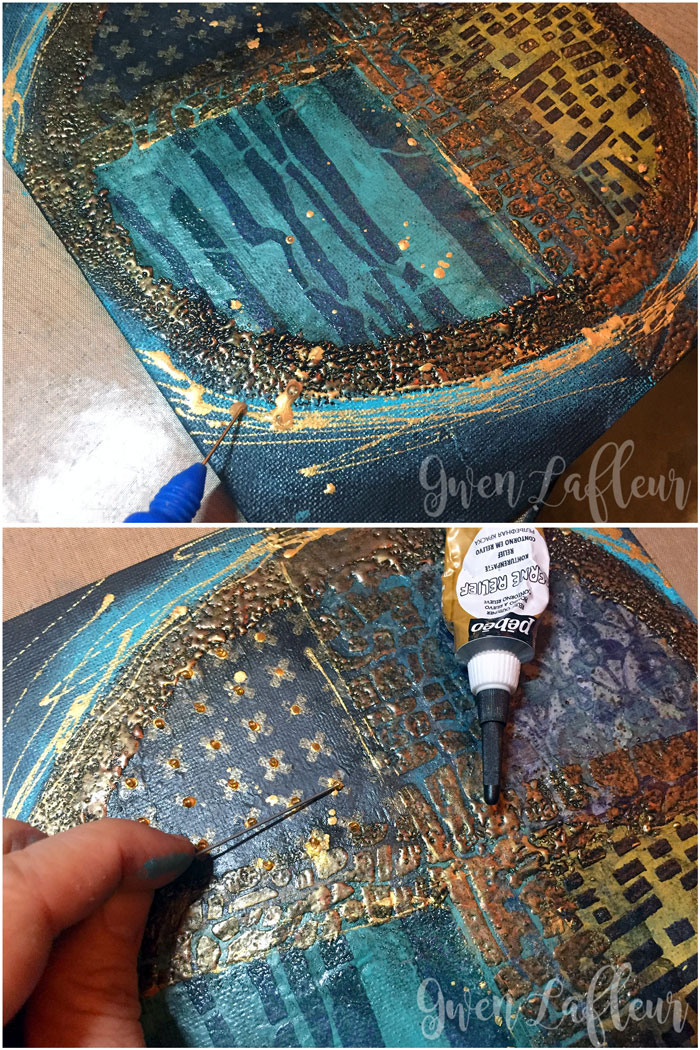
I wanted to add a touch of contrasting dimension and texture, so I used some Pebeo relief paste to add tiny gold glass seed beads into the center of my Xs. (As you can see here, I generally use a needle or hatpin to place beads.)
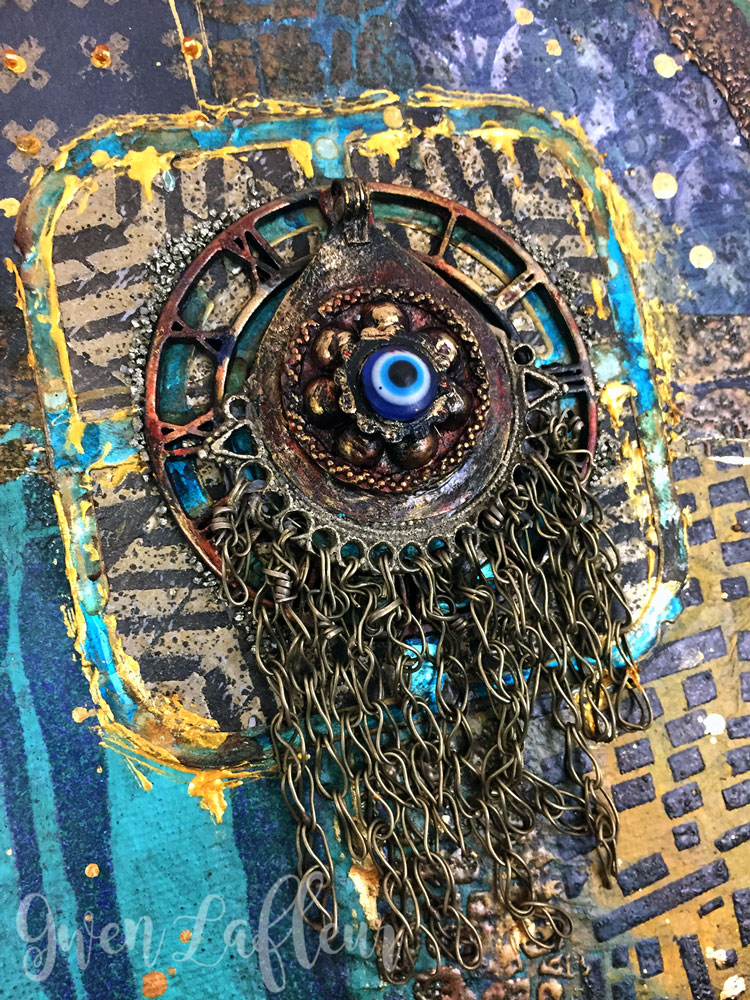
With that, the background was done and it was time to start building my focal point. I started by stenciling my Art Deco Sunburst Medallion stencil onto deli paper that had been painted black, then I embossed it with Mirror Gold EP. Next I took a shape from the Periscope Die Set by Seth Apter that had been cut from a thin sheet of teal colored aluminum and added some alcohol inks, then glued it on top.
With that, the background was done and it was time to start building my focal point. I started by stenciling my Art Deco Sunburst Medallion stencil onto deli paper that had been painted black, then I embossed it with Mirror Gold EP. Next I took a shape from the Periscope Die Set by Seth Apter that had been cut from a thin sheet of teal colored aluminum and added some alcohol inks, then glued it on top.
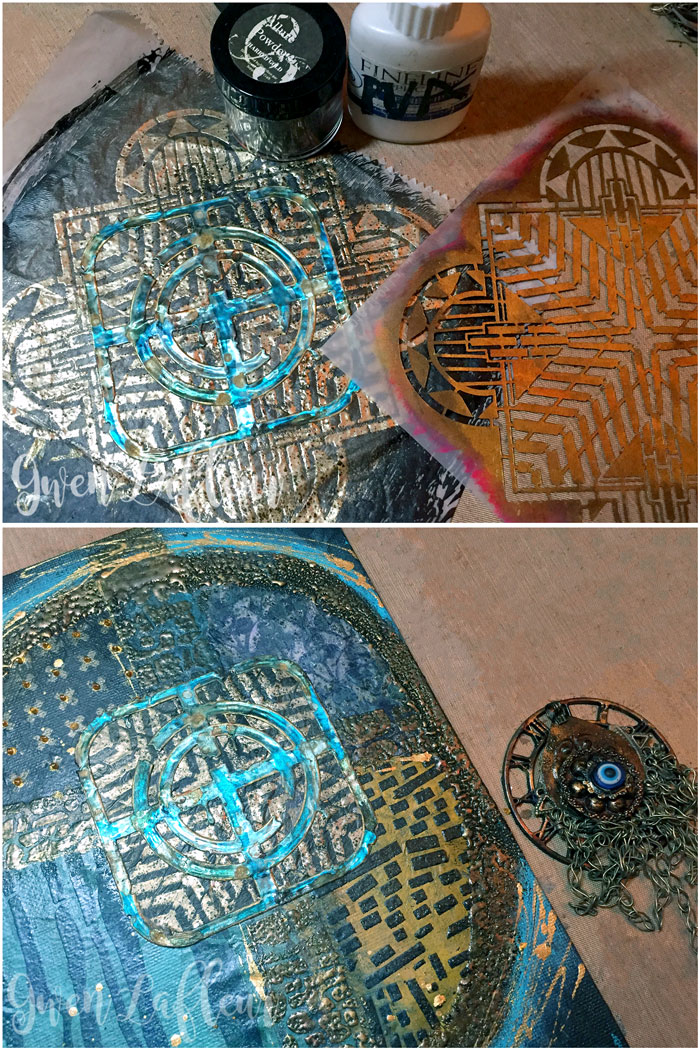
I cut around the diecut piece and then adhered it onto my panel. To go on top, I rounded up a few found objects - a metal clock face, some broken jewelry parts, and a glass Turkish Nazar. I assembled those into a focal piece and adhered it in the center of the diecut.
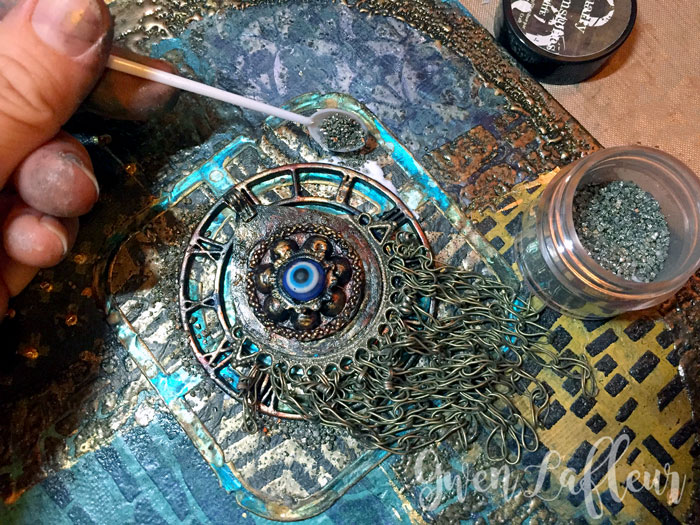
Finally, I added a sprinkling of Pyrite Gemstones around the border of my focal piece, and it was finished!
Here are a few closeups so you can see some of the details of the embossing - it's such a natural pairing with stencils!
Here are a few closeups so you can see some of the details of the embossing - it's such a natural pairing with stencils!

That's it for this tutorial, but if you enjoyed this project you might also be interested in my tutorials for creating abstract artwork with Baked Texture embossing powder and a video tutorial for creating texture with embossing powder.
You might also like...