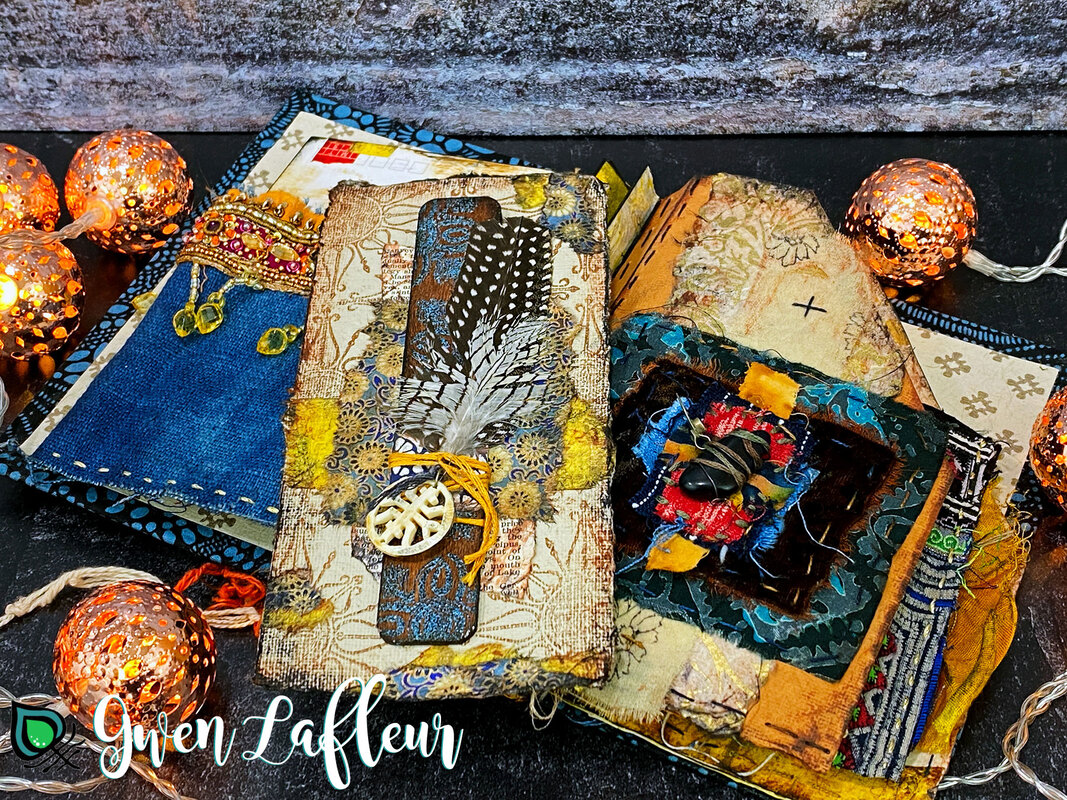
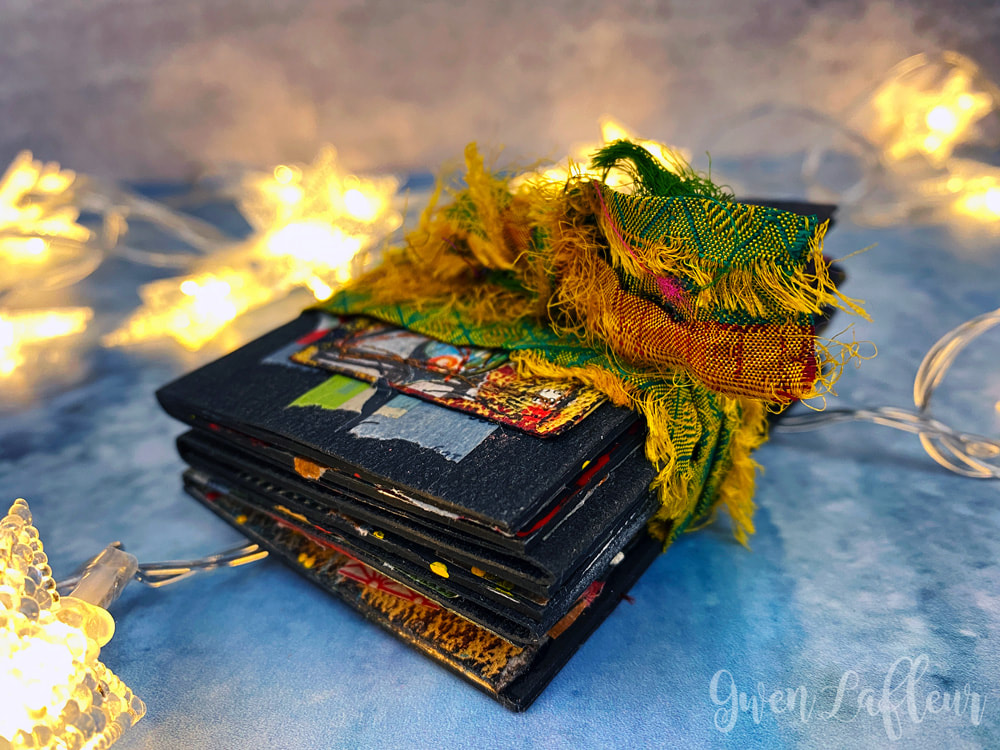
 Hi all! It's been a while, but I was finally able to finish up a tutorial I've had in the works for about the last two months. I've used kraft-tex from C&T Publishing as the basis for a fun new mini accordion art journal. There's plenty of collage, some stamping and heat embossing, and even some stitching. 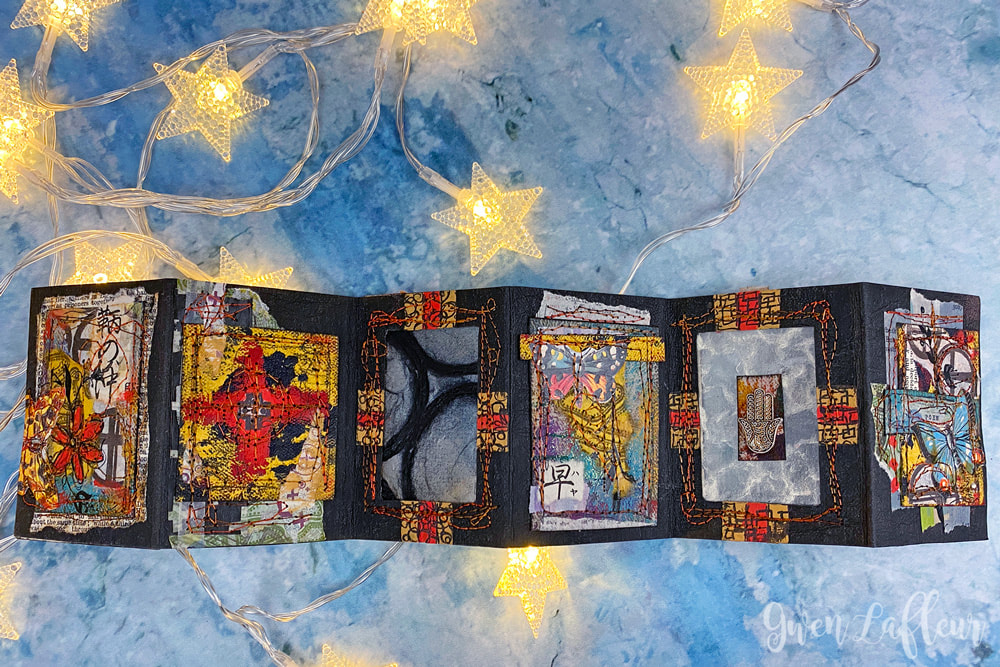 Here you can see a peek at the finished outside of the journal, but be sure to head over to view the full tutorial for details and step-by-step instructions and photos.
0 Comments
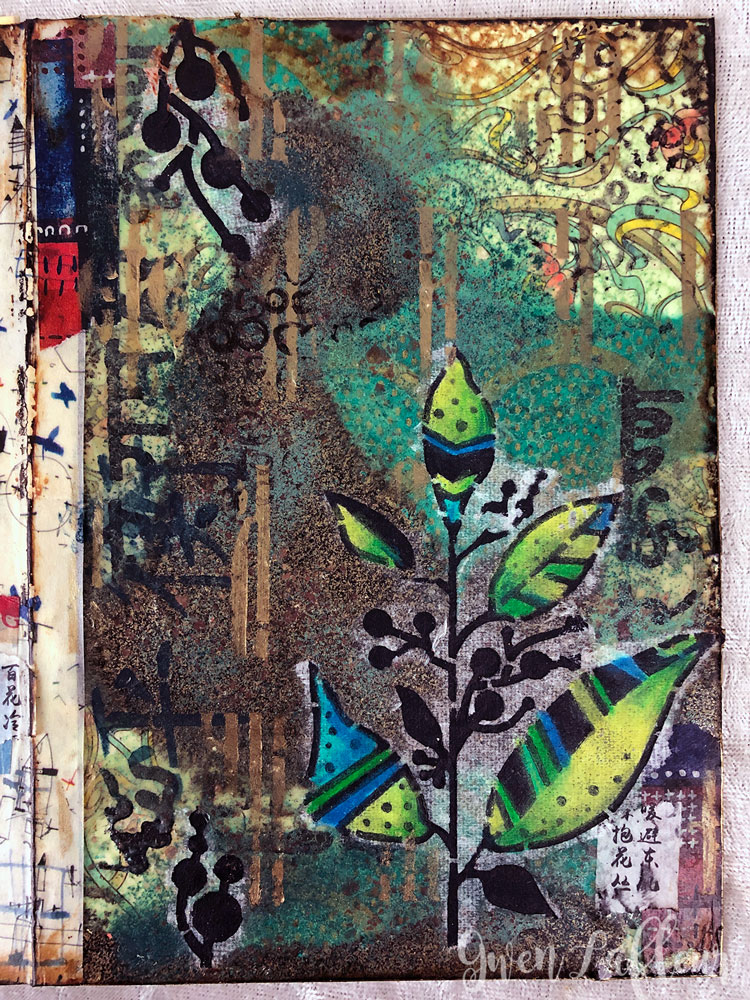
I have a new tutorial available today over on the StencilGirl blog! I'm sharing one of the ways I like to art journal on top of layers of paint and images left over from cleaning off my stamps and paint brushes on the blank pages of my journal. 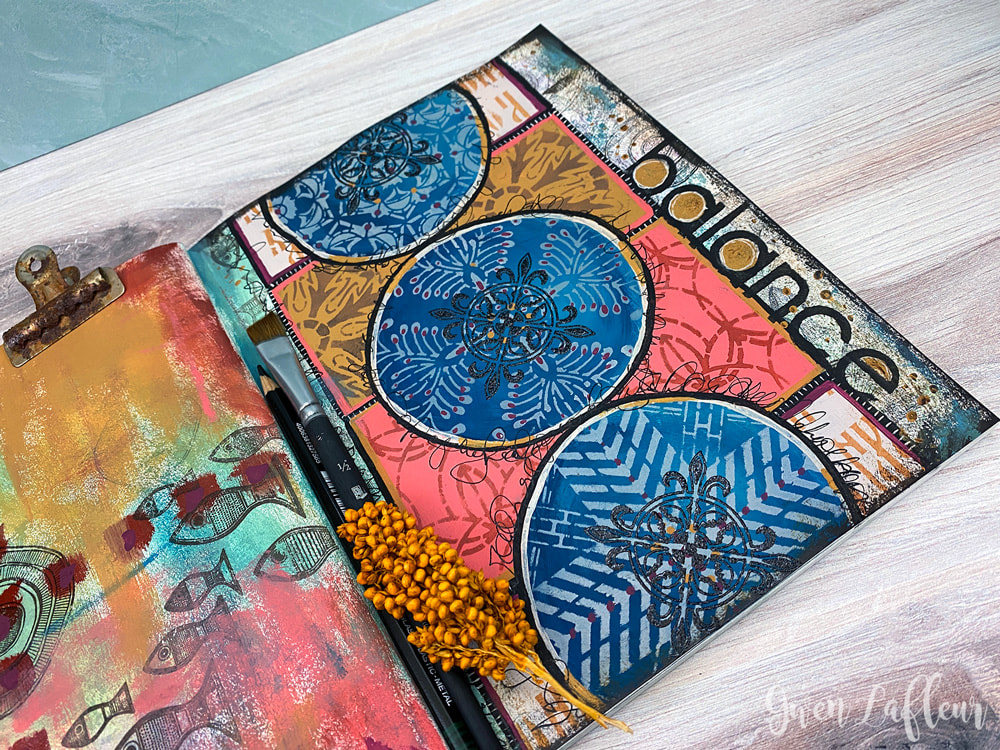 If you'd like to see more on how this page came together, make sure to head over to StencilGirl Talk to see my step-by-step photo tutorial. You might like... I'm thrilled to start 2020 with the announcement of three new stamp sets that I've designed for PaperArtsy and so excited that I'm finally able to share these new designs. 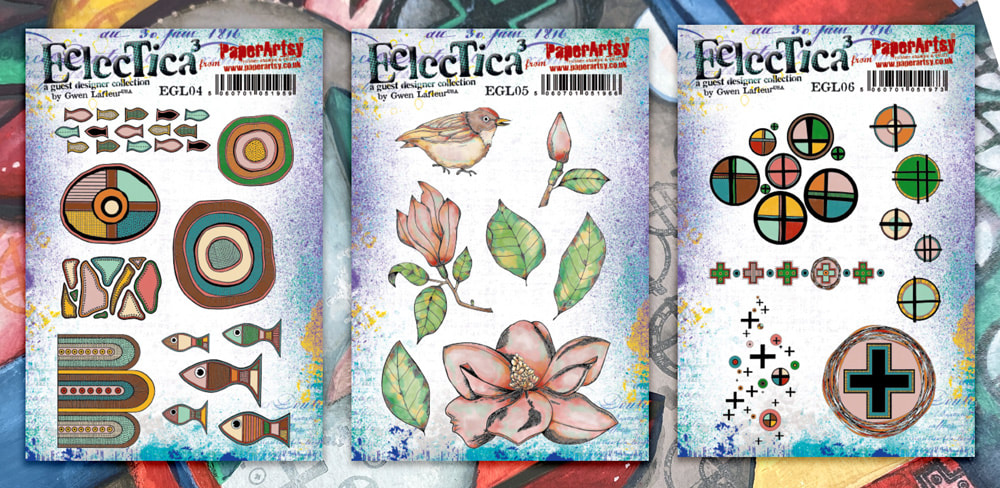 EGL04 - Aboriginal Inspired The first set in this release is all based on drawings and designs from my art journal which were inspired by Australian Aboriginal artwork (a long-time fascination of mine since the first time I saw examples of this art form, close to 20 years ago.) All of the designs in this set are hand-drawn and incredibly detailed. And... fish, of course. 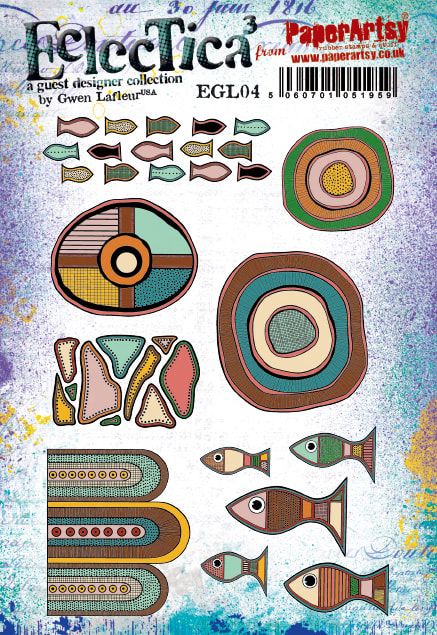 EGL04 - Aboriginal Inspired Stamp Set The designs in this set are some of my absolute favorites. The patterned scalloped border can be repeated both end-to-end and back to back to create various borders and lines. The small fish and the stamp with the irregular shapes and dots can also both be repeated to make backgrounds and patterns. Of course, you can really repeat all of them to make a variety of collage papers and backgrounds, as you can see in my sample below. 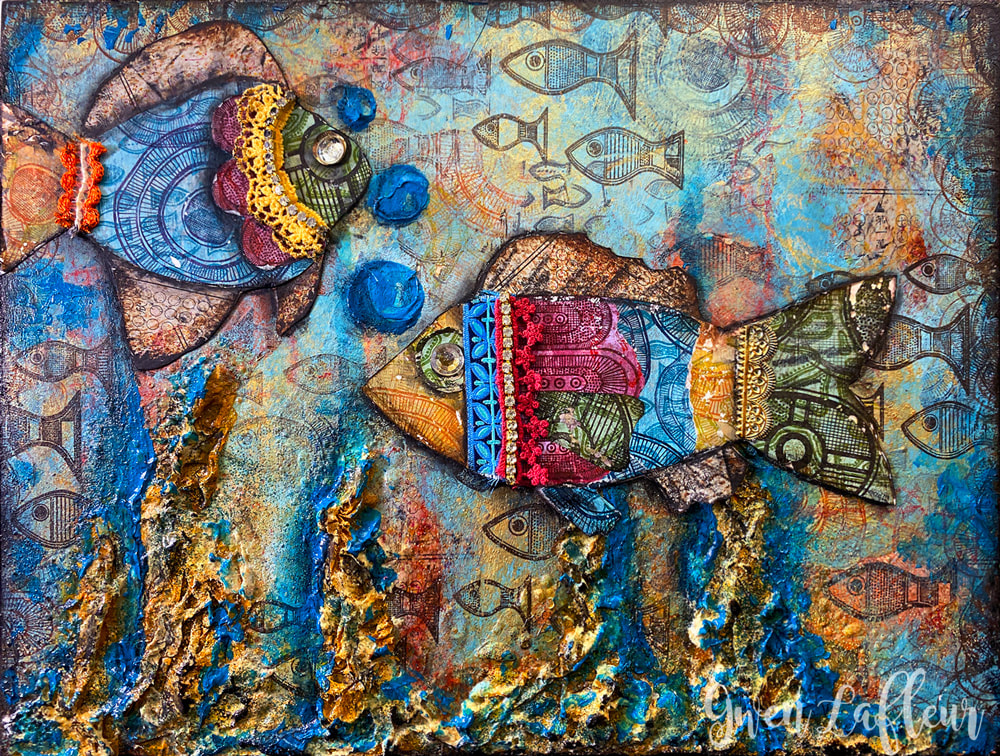 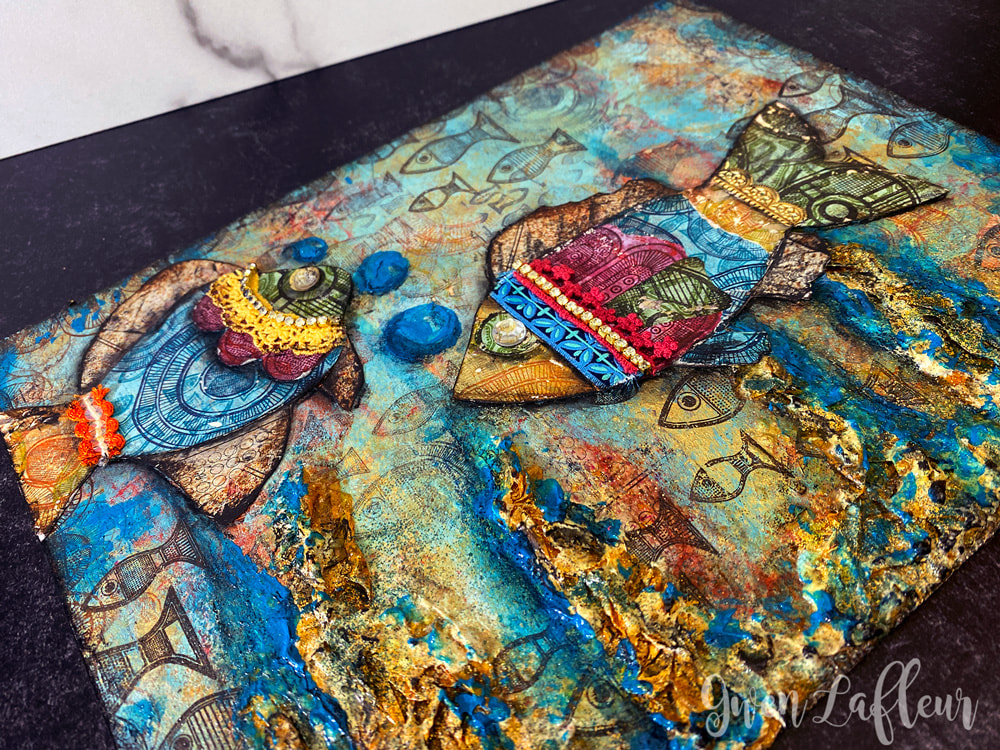 EGL05 - Southern Magnolias The second set in this release is again hand-drawn and entirely based on a set of hand-carved stamps that I made over the last year. 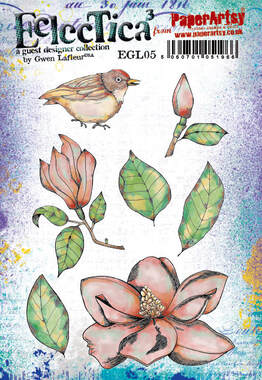 EGL05 - Southern Magnolias Stamp Set These designs were inspired by the huge Southern Magnolia tree in the backyard of my family home - I love seeing it covered with huge blossoms in the spring, and nearly year-round it's full of birds flitting in and out of the tree. We see lots of cardinals, blue jays, even woodpeckers. But I have a soft spot for the adorable, tiny finches as they hop along the branches. 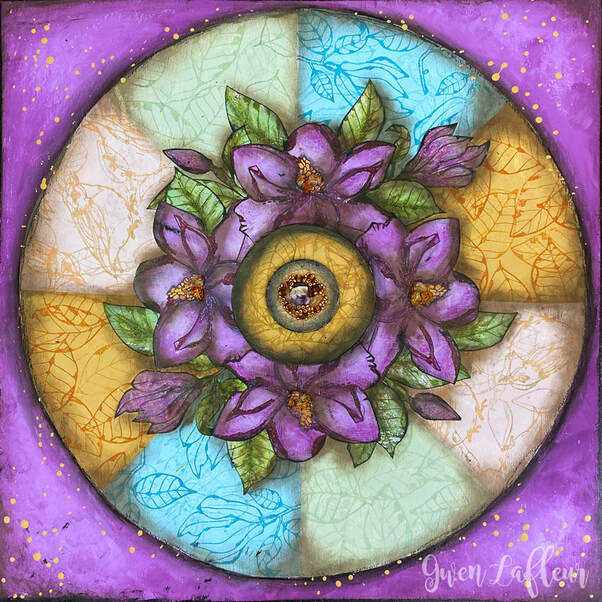 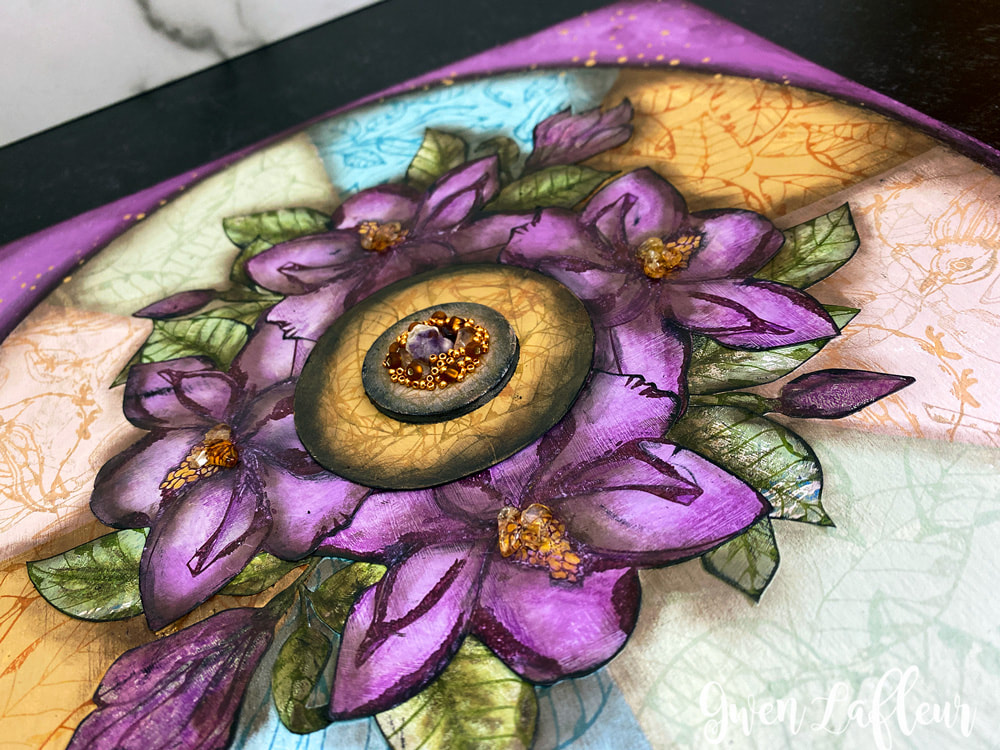 EGL06 - Plus Signs The final set in this release is the one I call Plus Signs. This is one of my personal symbols; you'll see it show up very frequently in my journals and artwork, so I was excited to create variations on this symbol and have them made into stamps. 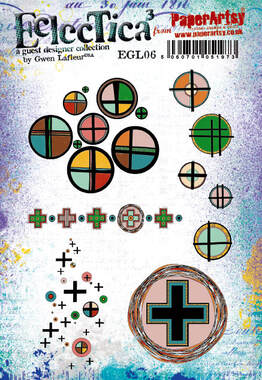 EGL06 - Plus Signs Stamp Set The five circles down the right side are all one stamp, so you can use them as a border. I actually cut them apart in my set so that I can use them individually or rearrange them into a different order or configuration. (Of course, as the designer I have more than one set, so my second set keeps them all together.) You can repeat this and the smaller plus sign border to make long lines. The scattered plus signs and the circle plus sign cluster can also repeat to make great backgrounds and larger patterns. I like using the large plus in the scribble circles as a focal point, or even as the eye in a portrait as you can see in my sample below.  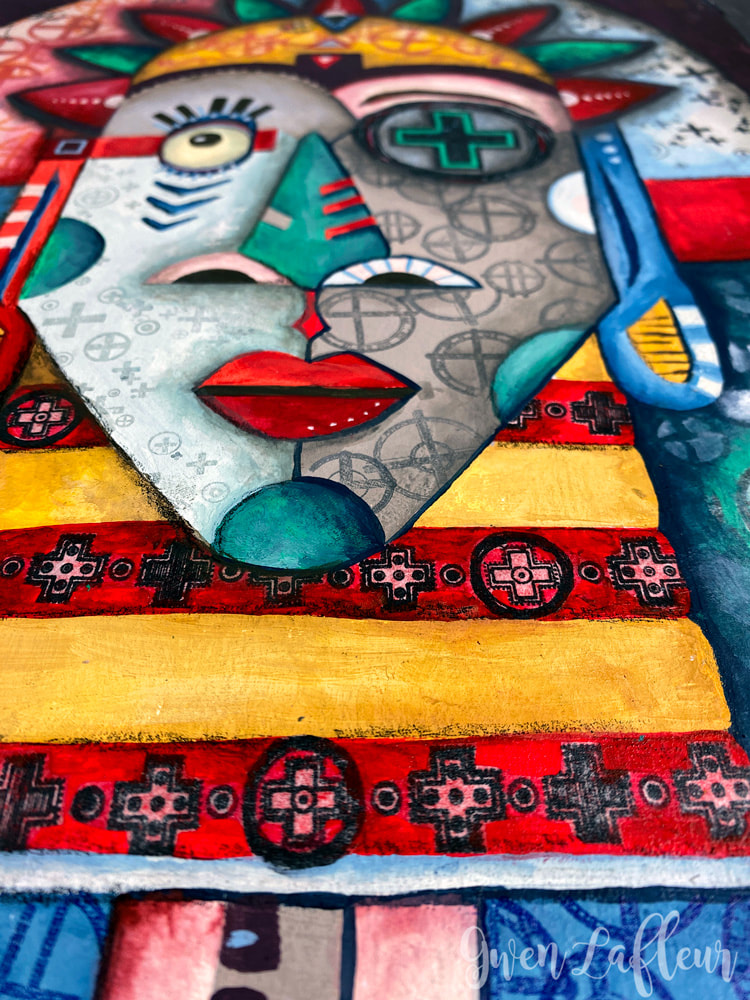 EGL04 - EGL06 Mashup For my release post over on the PaperArtsy blog, I also created a new piece using all three stamp sets. I really wanted to feature the little finch stamp from EGL05 as the focal point and then built up the layers under and around it to mix all the designs together. 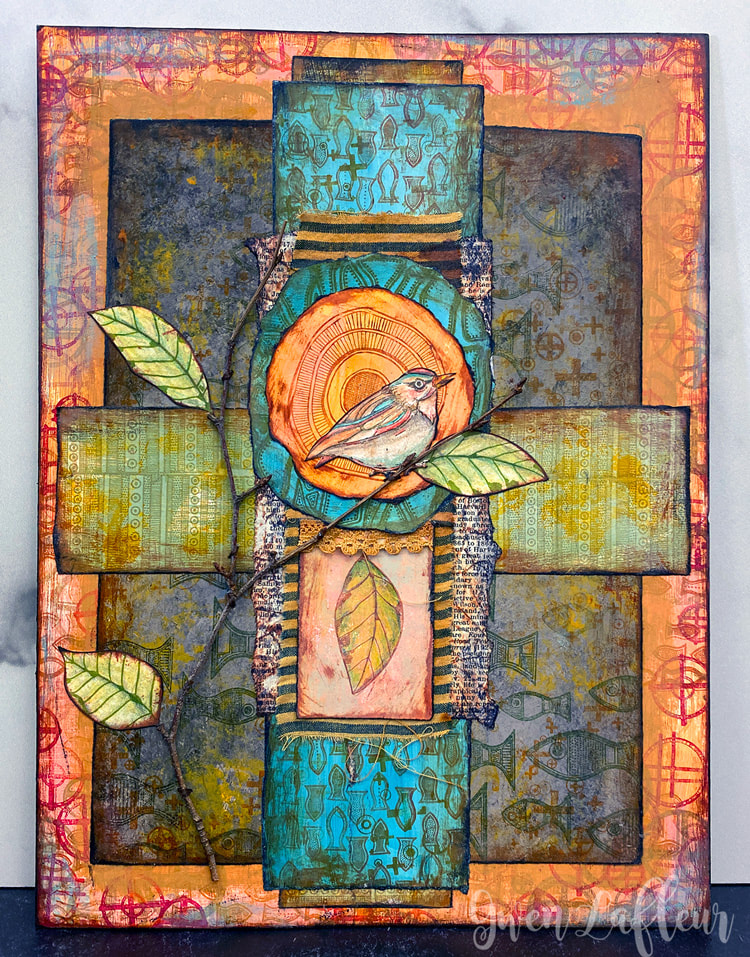 I even used real branches for my little bird to perch on; they're stitched to the page and I positioned the colored and cut out leaf stamp images so they looked like they were growing out of the branch. 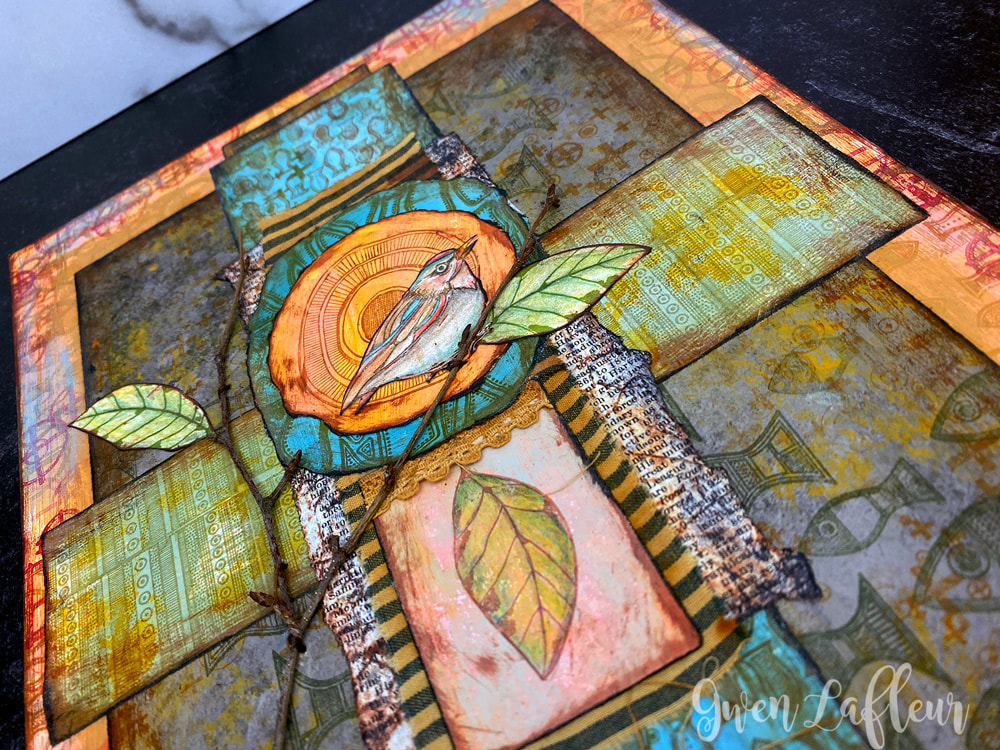 Make sure to head over to the PaperArtsy blog for the full release post. I have handmade card samples for each stamp set as well as the tutorial for how to make the piece above featuring all three stamp sets. I'm so excited to be able to have my designs available in stamps... I love using them in my own artwork and I hope that you love them as much as I do - I can't wait to see what you all do with them! The new stamps are available in my shop (along with my original three sets,) or check with your local store to see if they've already got them in stock. You might be interested in...
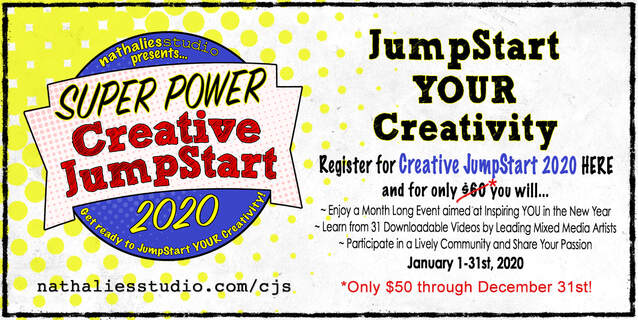
I'm very excited to announce that I'll be participating again for the 5th time as an artist in Creative JumpStart (CJS) 2020, run by Nathalie Kalbach. If you're not familiar with CJS, this is its 9th year and a one-of-a-kind online event to kick your creativity into high gear in January 2020.
Join in the fun to get daily videos where you'll learn techniques, discover new materials, and connect with other artists and crafters.
Throughout the month of January you get access to 31 downloadable videos from 31 featured artists (called JumpStarters, and like I mentioned, I get to be one of them!) Check out this preview video for more info and a quick introduction to all of this year's JumpStarters: CJS20 Announcement from Nathalie Kalbach on Vimeo.
As in all the previous years, you get lots of daily inspiration - 31 days of videos from a variety of artists! Here's the breakdown of what you get when you sign up:
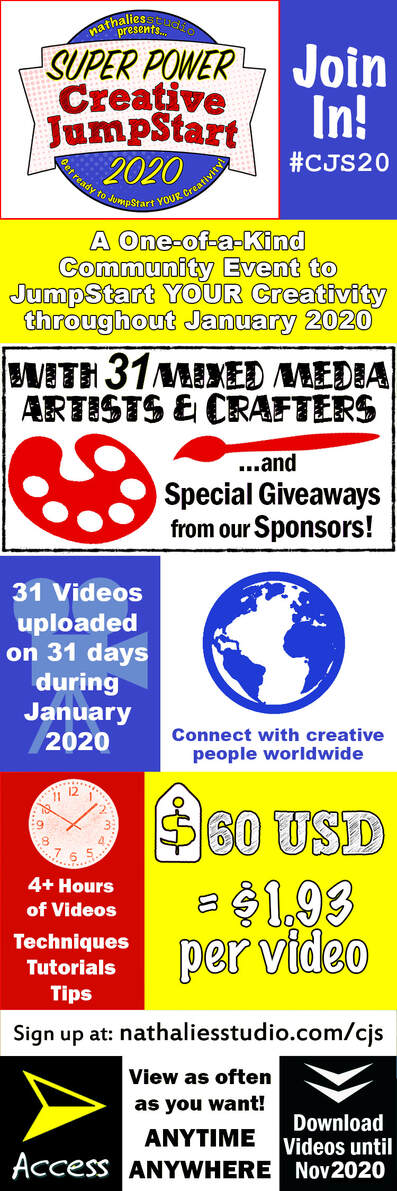
To sum it up, that's 31 videos with over 5 hours worth of video content - for just $50 until December 31st 2019. After that, the price goes to its normal sale price of $60 on January 1st 2020.
So what are you waiting for? And you know what that means... time to save some money! There are two Cyber Monday sales happening that I wanted to share... first is the big sale over at StencilGirl where you can get all of my stencils on sale for 25% off starting now and going through 11:59p.m. CST, December 3, 2019. 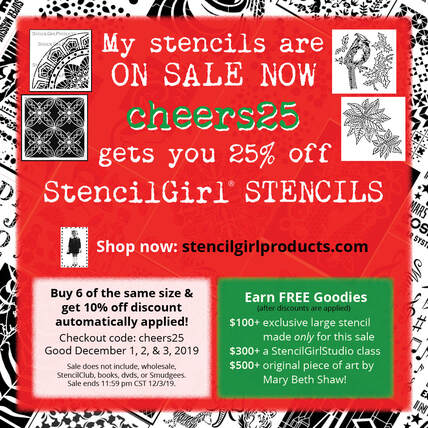 To get the discount, you need to use this coupon code when you check out: cheers25 And... not only do you get 25% off, but if you buy 6 of the same size stencils, StencilGirl’s everyday 10% discount is automatically applied to those stencils. But wait, there's more! You can also earn freebies when you spend over a certain amount!*
*Please note: Freebies are calculated after the discounts are applied. Now for Cyber Monday sale number two... the one in my shop! If you missed the announcement in my newsletter last week, never fear - you can still save 20% off your entire purchase (including lots of already marked down sale items) through midnight eastern time tomorrow night (December 2nd.) 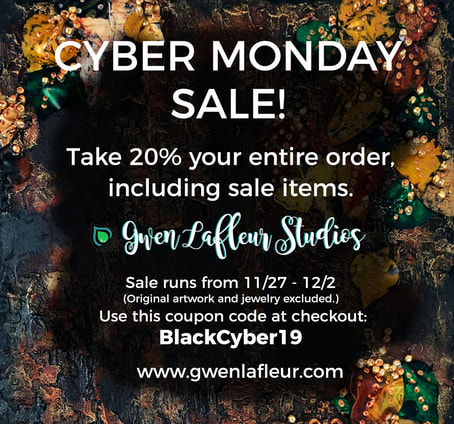 Make sure to use the coupon BlackCyber19 at checkout to get the discount. Don't forget, this applies to my new rubber stamps from PaperArtsy, all of my Boho Blends embossing powders and Boho Bits embellishments from Emerald Creek, and all of my stencils as well as lots of other goodies (original artwork and jewelry are excluded.) Happy Cyber Monday shopping - I hope you enjoy the deals!
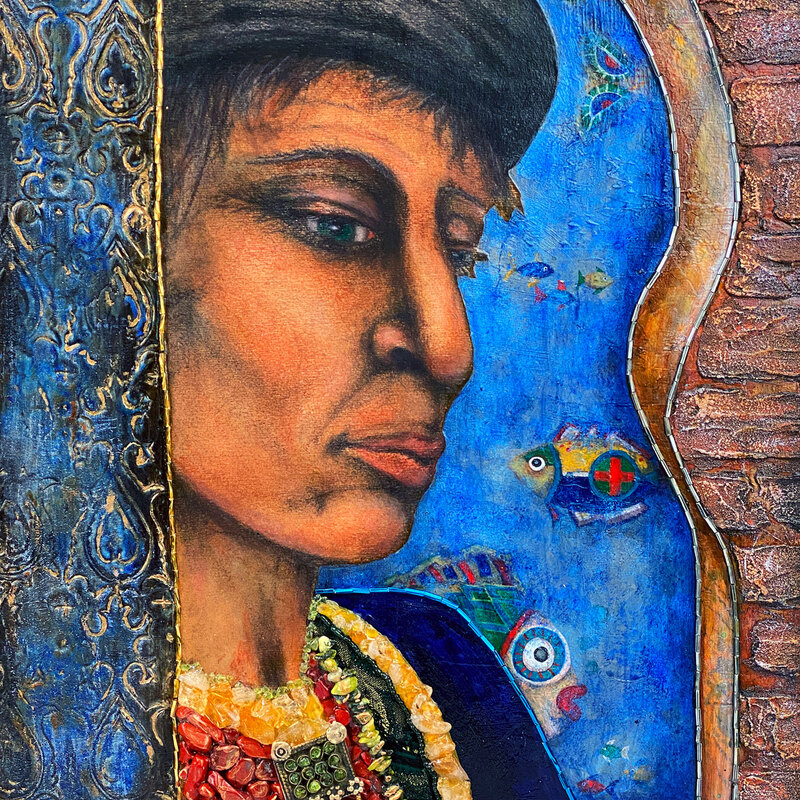
 I have a new tutorial up today on the StencilGirl blog - in this post I'm sharing one of my favorite ways to use Posca paint pens with stencils to create layered art journal pages with bright, colorful "painted" focal images.
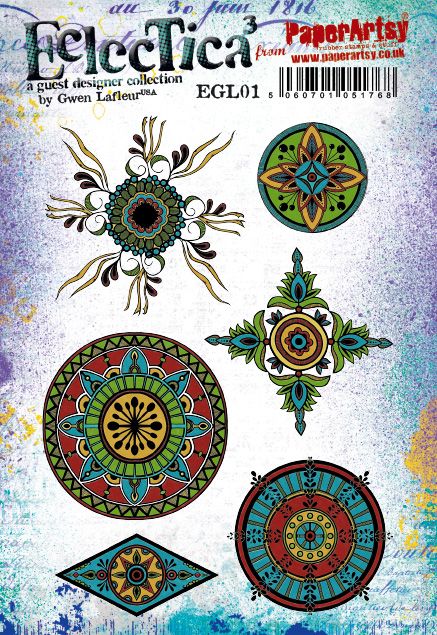
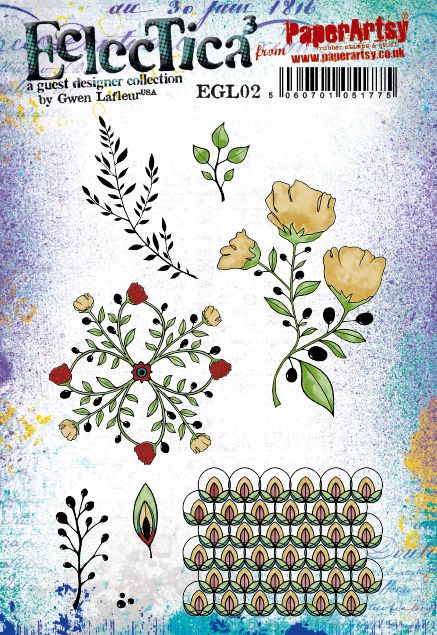
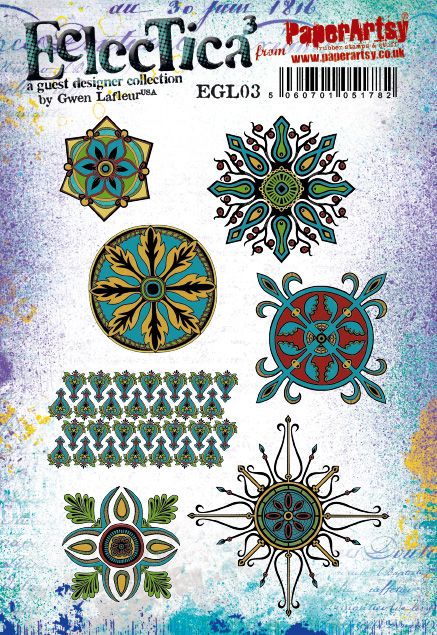
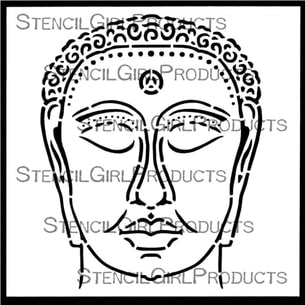
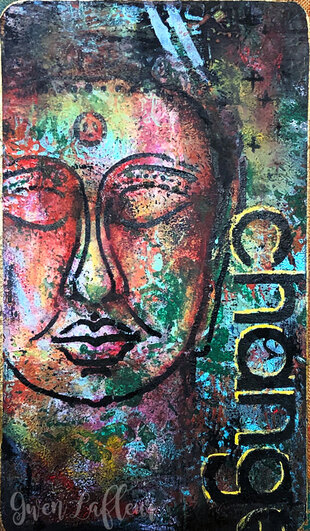
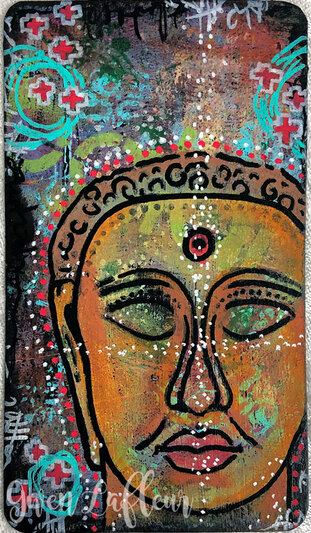
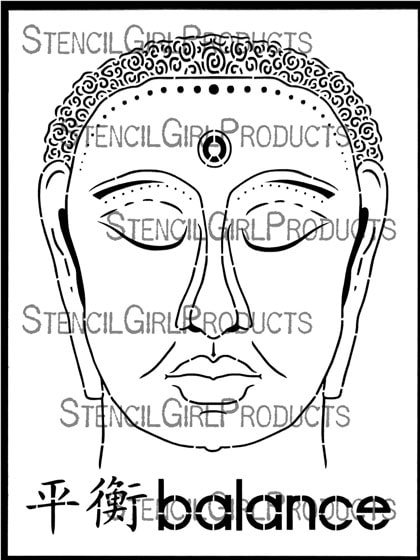
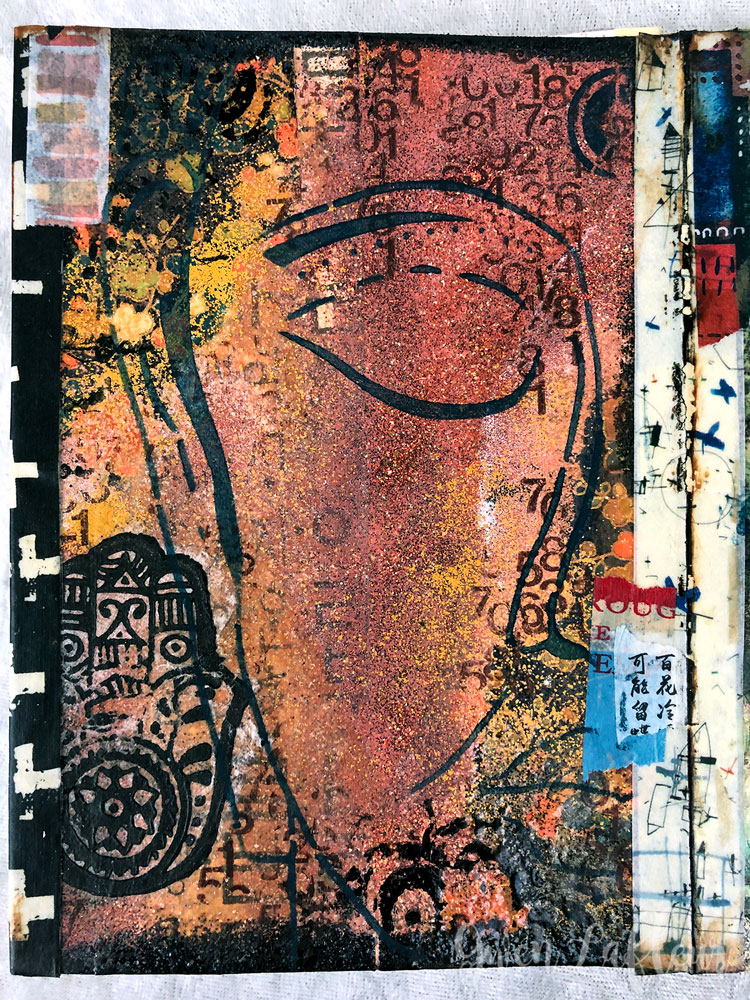
I'm so incredibly thrilled to share that, after many many requests, I now have rubber stamps! For this new line I'm beyond excited to be teaming up with PaperArtsy, one of my absolute favorite companies. If you haven't heard of them, they're a small family-run company based in the UK with a fabulous lineup of products and designers - I'm feeling quite humbled to have this opportunity to join the family. (And while I'm on the topic, don't miss the official announcement of this release with even more photos, projects, and a tutorial, over on the PaperArtsy blog!) The three sets in this initial collection are all based on my original hand-carved stamps. Each set measures 5" x 6" (13 x16.5cm,) and all of them come on cling-mounted, deeply etched red rubber - the details are amazing. The first set (EGL01) is the one I'm calling "Medallions." If you know my work and products at all, you know how much I love a medallion. I use circles in almost almost everything I do and I love the way these stamps give me so many more options for adding these types of designs into my work. I'm also really happy with how perfectly they work with my Boho Blends embossing powders from Emerald Creek. Here's a new mixed media piece that I created that features just the designs from the first set along with my Boho Butterflies stencil from StencilGirl. Inside the largest rusted tin circle, you can also see some of the Tumbled Carnelian from my Boho Bits collection with Emerald Creek. 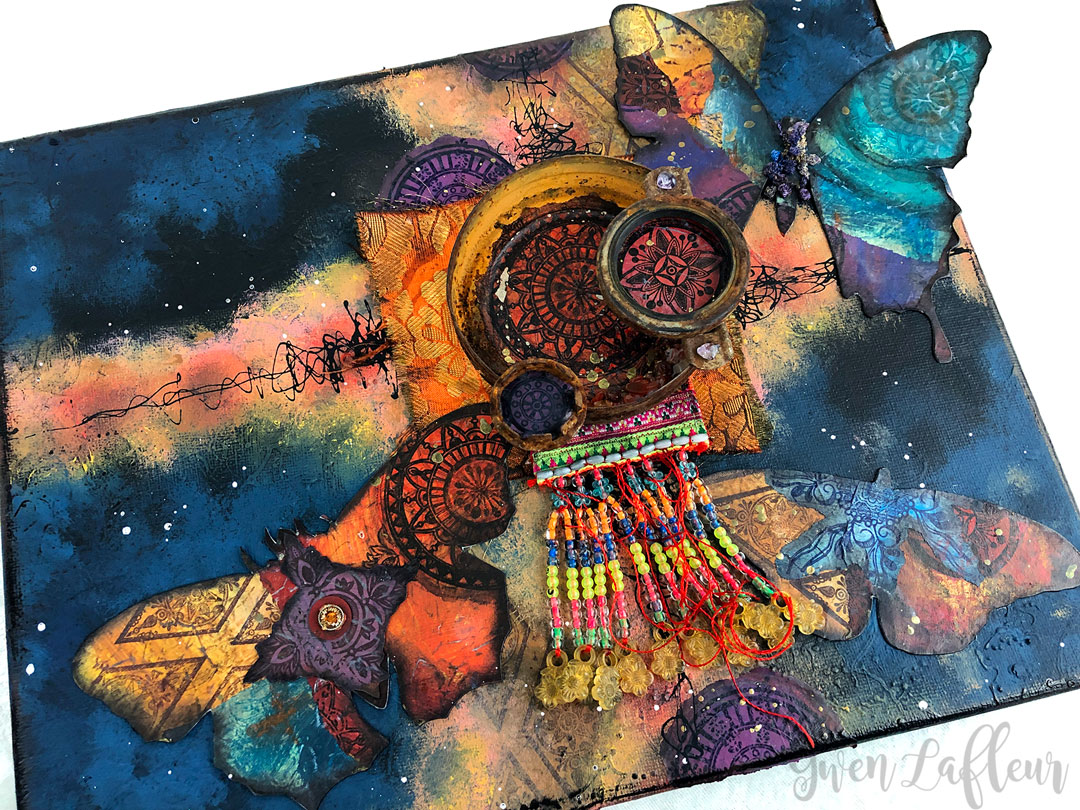 I made a set of collage papers to use as the starting point for this piece... each one is a different color and uses PaperArtsy Fresco Chalk Acrylic Paint along with mark-making and one of each of the stamps in the set. 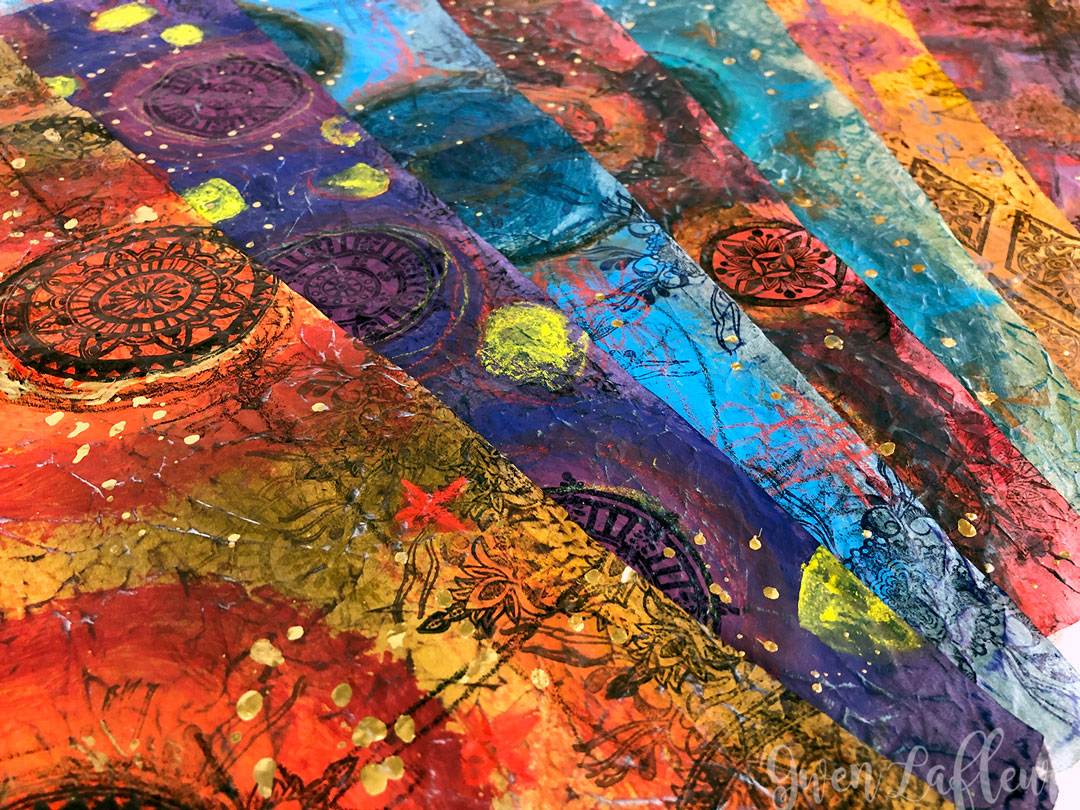 The second set, EGL02, I've been calling "Florals" and I based this around the large flower design that's from a stamp I carved for a specific project I made last December - it quickly became a favorite and definitely needed to be in this set. I added a floral medallion and a few different foliage accents to round it out. The repeating background stamp may look familiar as it's a smaller and more detailed version of the pattern in my Collage Textures & Patterns, Leaves stencil from StencilGirl. To introduce this set, I've created another new mixed media piece featuring each of the included stamps along with some dimensional bits and a few dried flowers and twigs that nicely mimic the color and shapes of the stamped designs. I also accented the assemblage piece with a few pieces of jade from the Amazon Adventures mix from my Boho Bits. 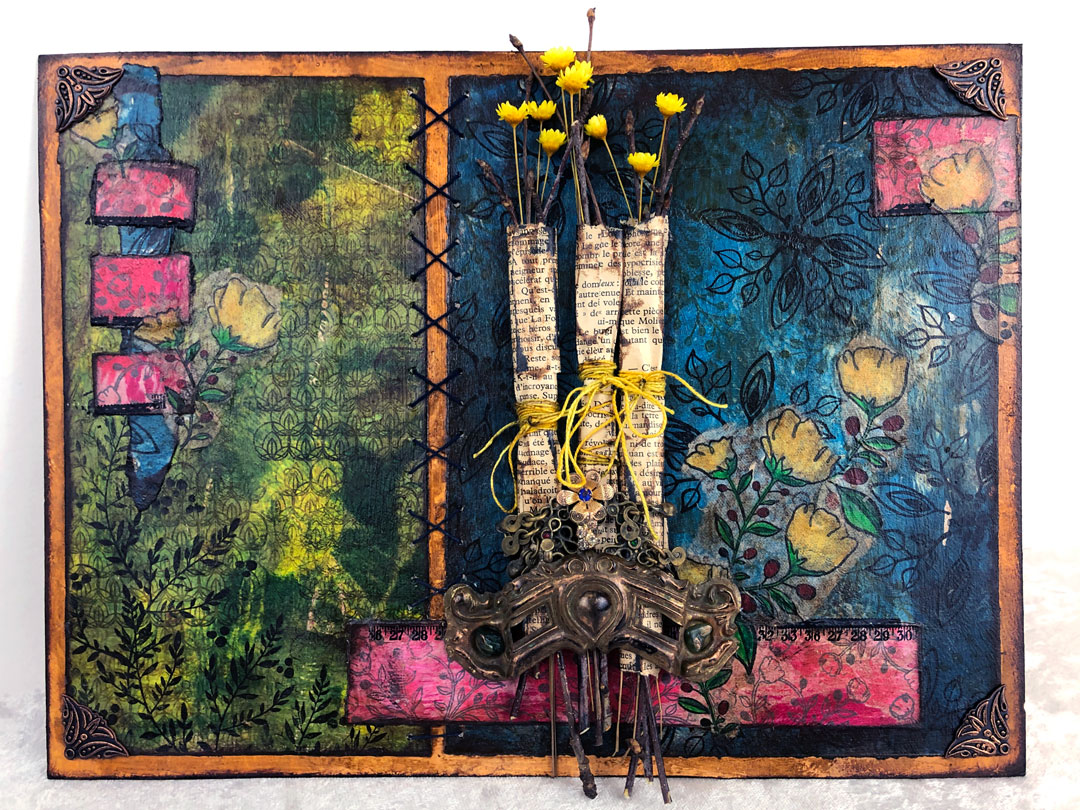 The final set in this release, EGL03, is the one I call "Motifs." This particular set includes seven stamps, five of which may look familiar if you've seen my stencil designs. These are smaller and more detailed versions of some of my earlier stencils, which were also based on my hand-carved stamps. I love that having the designs in both a stamp and a stencil provides a lot of versatility - the different sizes allow you to layer or mix them together. I used this set to create an art journal spread: 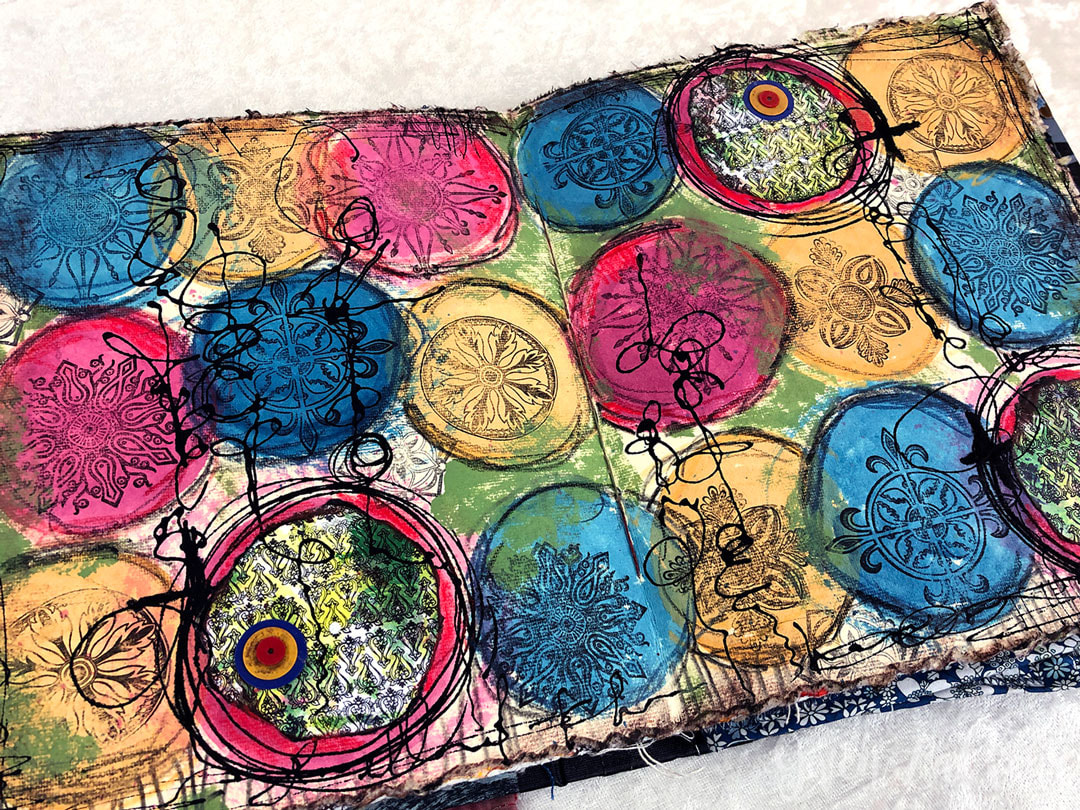 I used the PaperArtsy Fresco Chalk Acrylic Paints with water to get more of a gouache effect for the circles in the background, then stamped different images in each circle. I especially love the torn, collaged circles where I repeated the background stamp from this set on a piece of painted paper. The contrast of the density of that pattern with the larger motifs makes me happy. For the last project, I mixed all three of the stamp sets together and layered them with one of my hand-drawn portraits which was printed out on rice paper so I could use in this piece. 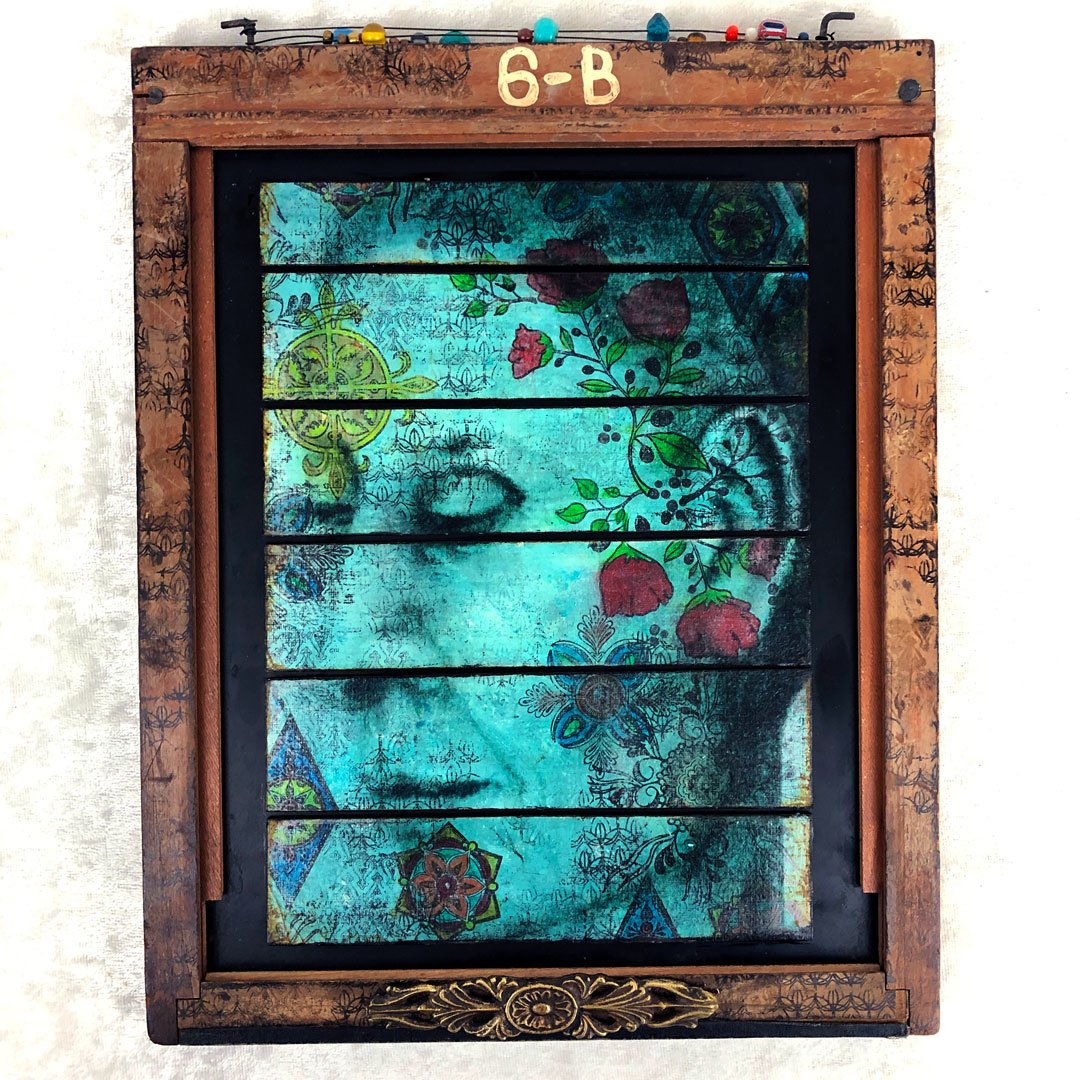 i really love the layering of the Fresco Chalk Acrylic Paint, the stamped and colored images, and the collaged portrait. I set them in an antique film cartridge and kept the embellishment to a minimum to keep the focus on the portrait and I'm very happy with how it came out. If you want to see more, don't forget that I have additional photos, three handmade cards made with each stamp set, and even a short tutorial for the final project shared above which combines all three sets. It's all in my official introduction post up today over on the PaperArtsy blog. I'm sooooo excited about these stamps - I love how they come out and I'm having a blast using them. I hope you like them as much as I do! Check out products from this post... I'm excited to share that by popular demand, the 9" x 12" Chinese Garden - Buddha stencil from my June 2019 release with StencilGirl is now available in small and mini sizes!
The new 4" x 4" mini stencil is the perfect size for tags, cards, and mini art journal pages like the one here from a recent 2-1/2" square mini art journal. 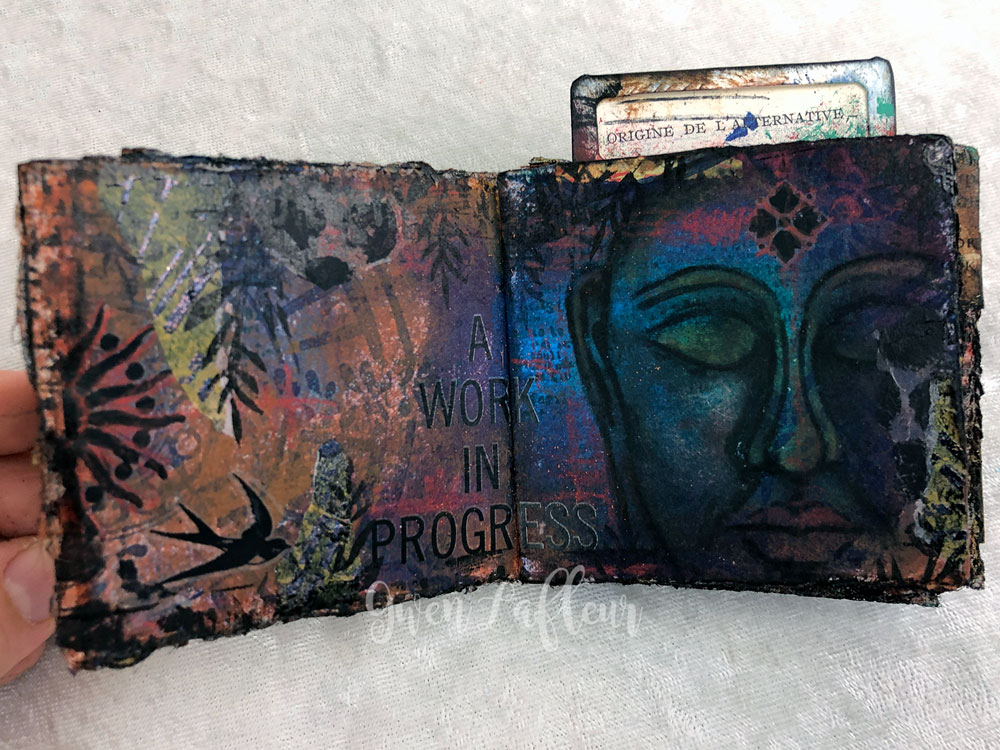 The small version worked perfectly on this 6" x 6" accordion art journal page: 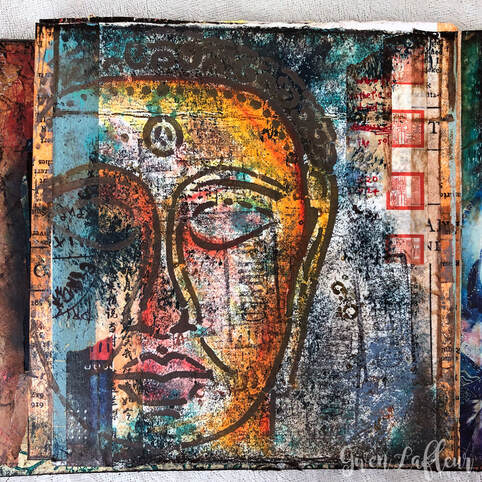 I deliberately designed these so that you could either color them in completely, leave it as a simple line drawing, or stencil over top of a more complex background and use color and shading to leave some or all of it showing through the face. Here you can see more examples of how I used most or part of the face on a heavily patterned background and faded out the color so the background would come through... some leave very little showing, some allow a lot to remain visible. I love the variety of the looks you can get using the same stencils, products, and techniques in slightly different ways.
 Both of these new baby Buddha stencils are available in my shop, along with the original 9" x 12" large version. You might be interested in... Hi all, it's time for my quarterly column on StencilGirl Talk - I have a new mixed media project and tutorial available showing how I complete this piece, "Butterfly Medallion," from start to finish: 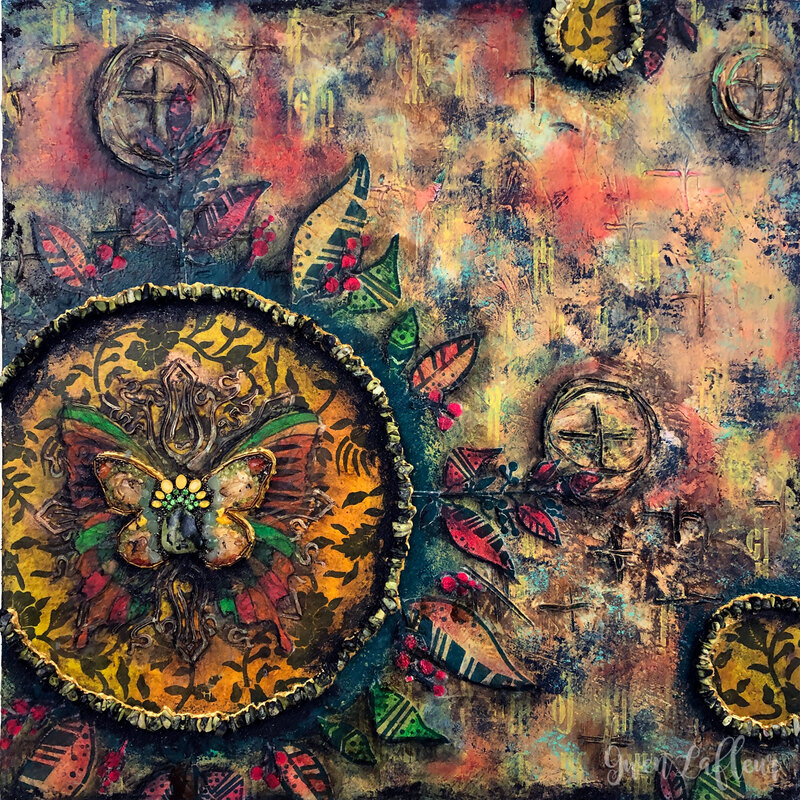 You can head on over to see the whole thing, including close-ups of the finished piece. It's also linked from my Tutorials page.
For those who might be interested, the original is also now available for sale in my shop. I'm excited to share that I have five new stencil designs available today from StencilGirl! I've added three new stencils to my Chinese Garden series as well as two new Collage Textures & Patterns options.
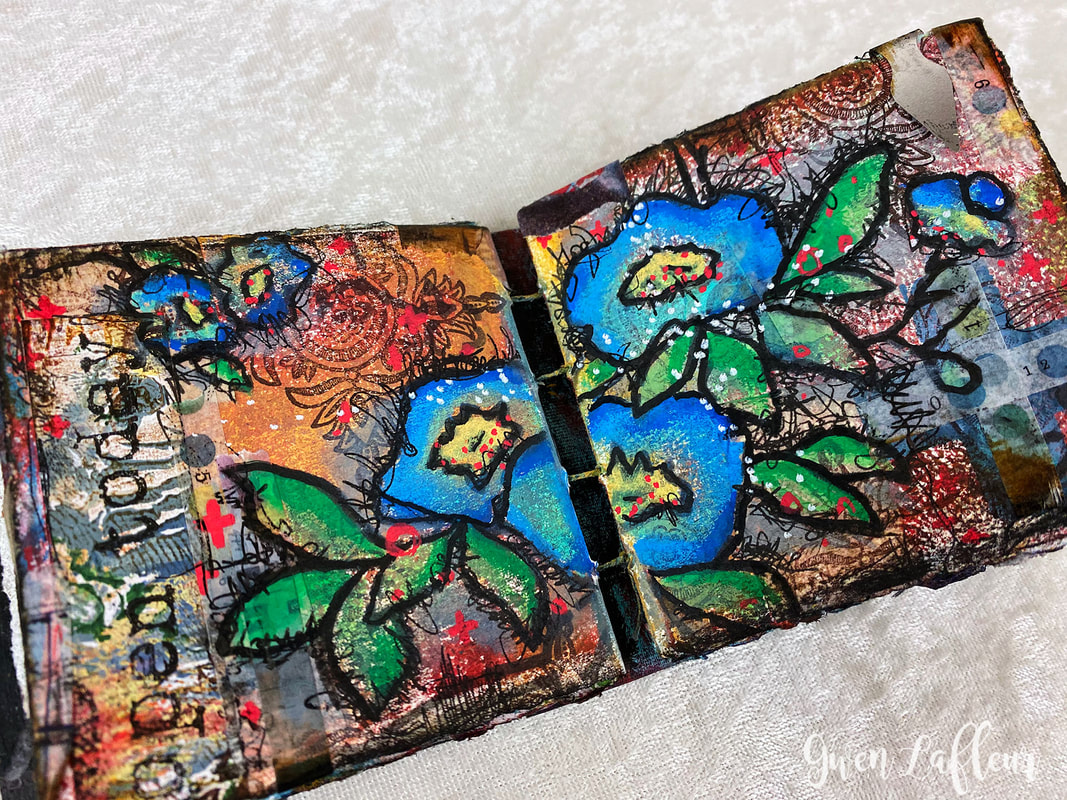
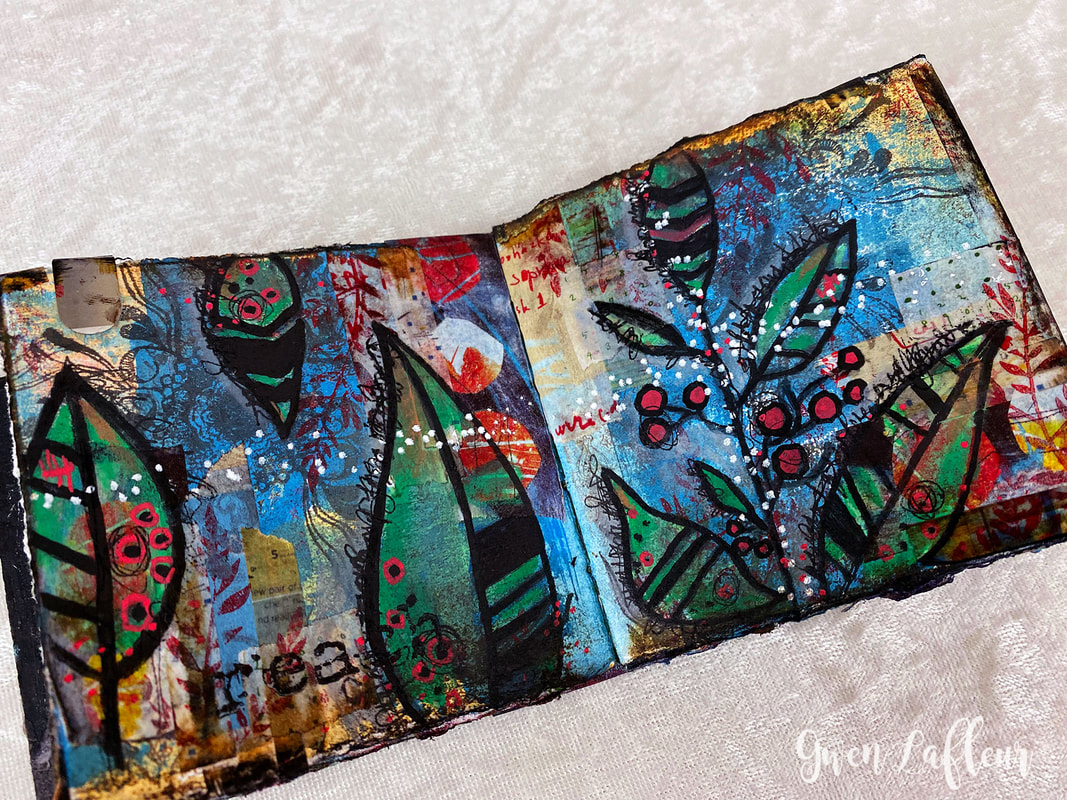
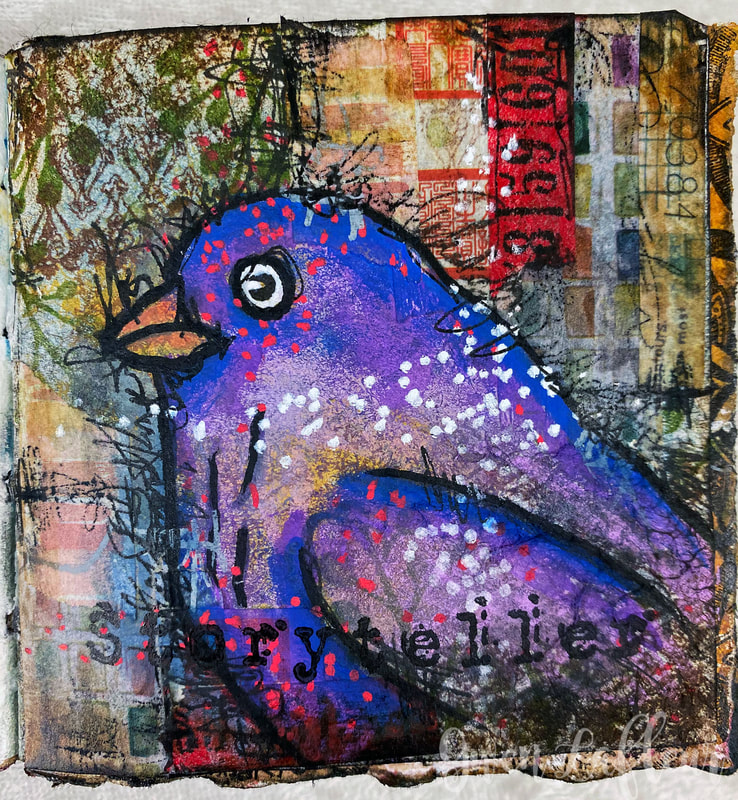
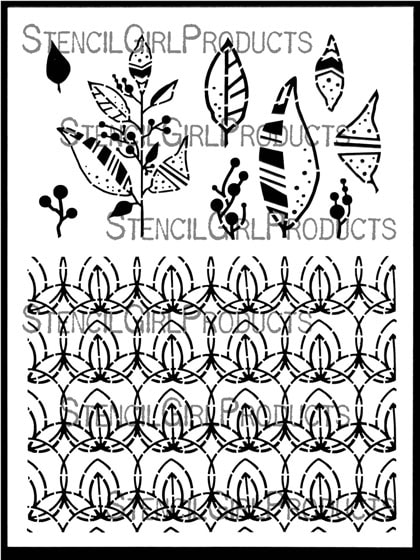
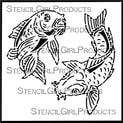
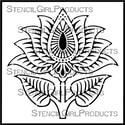
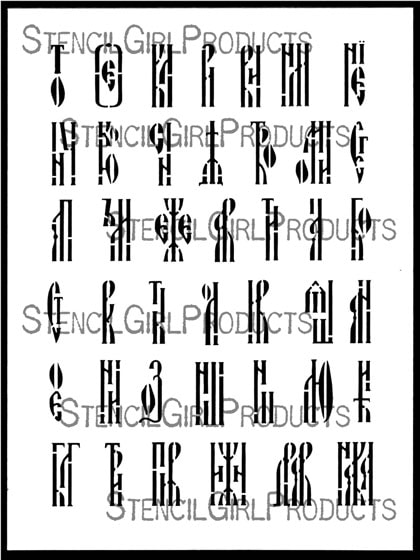
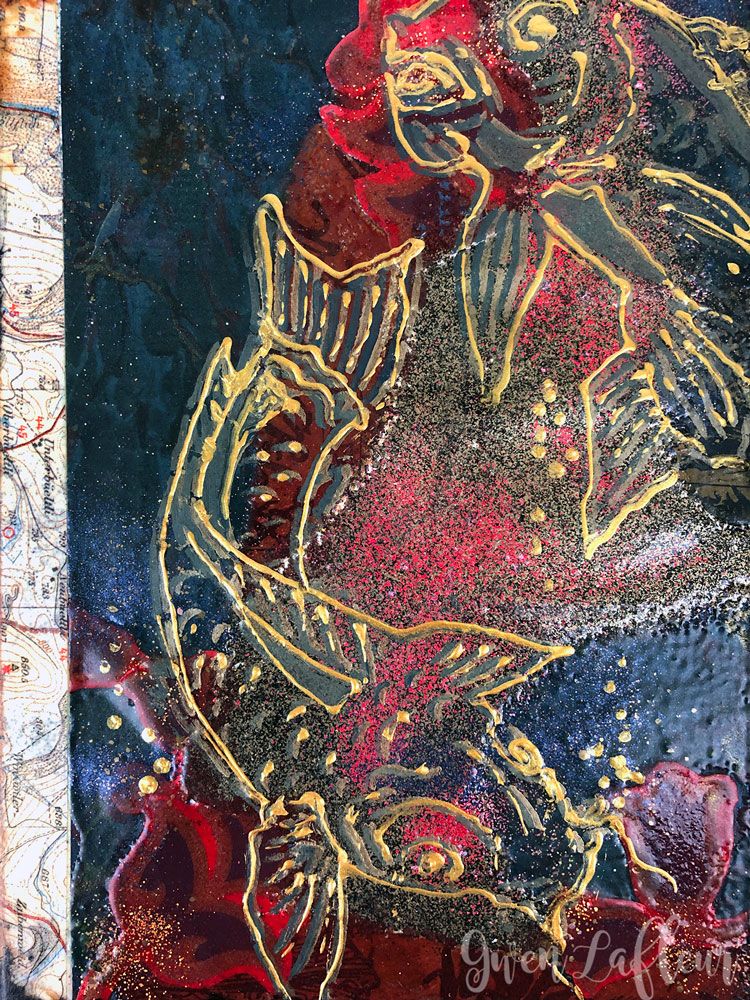
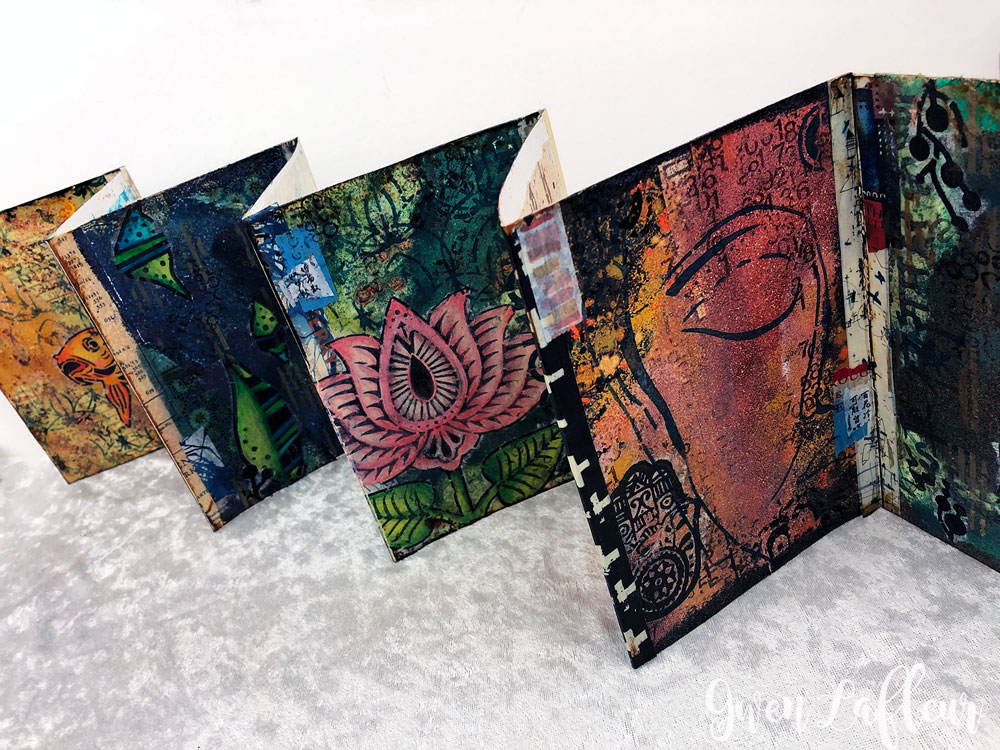
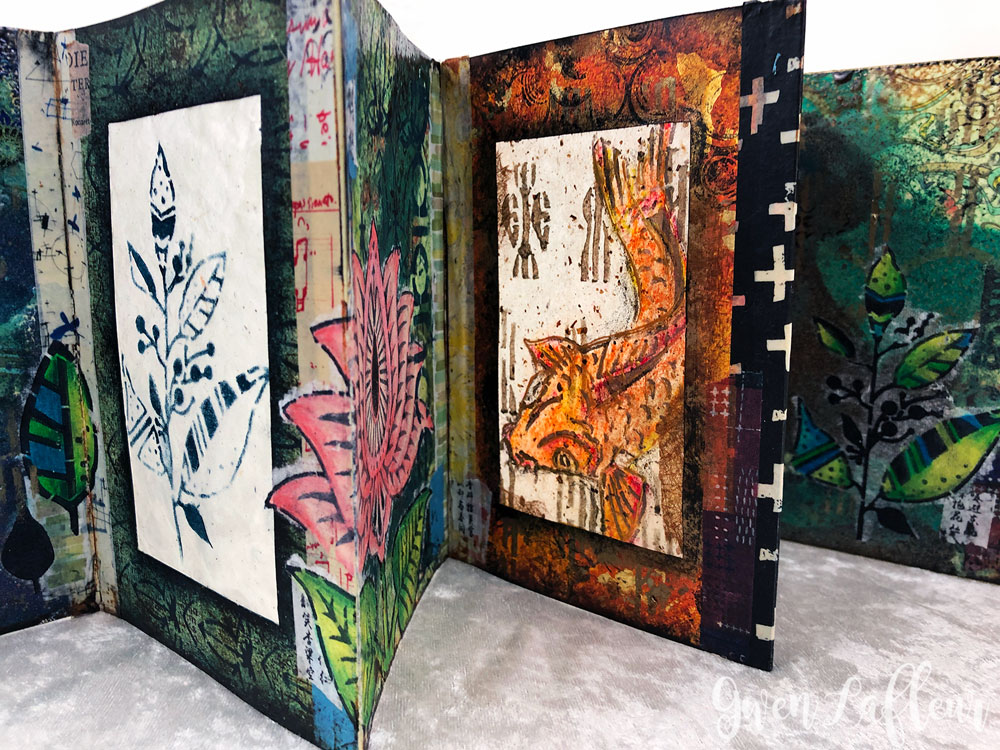
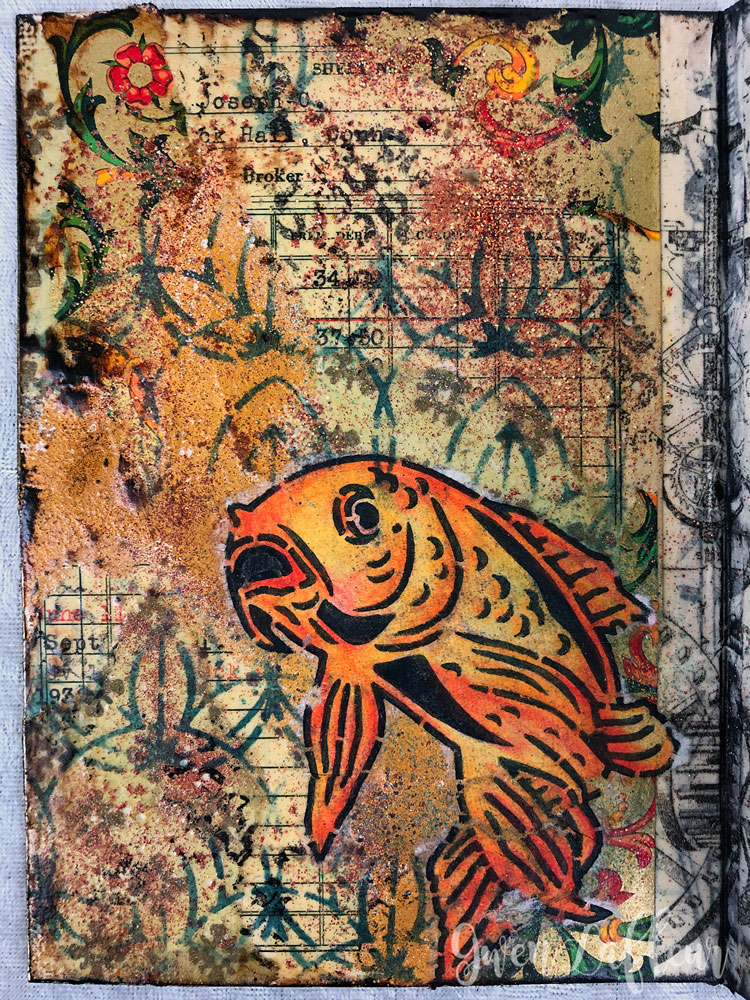
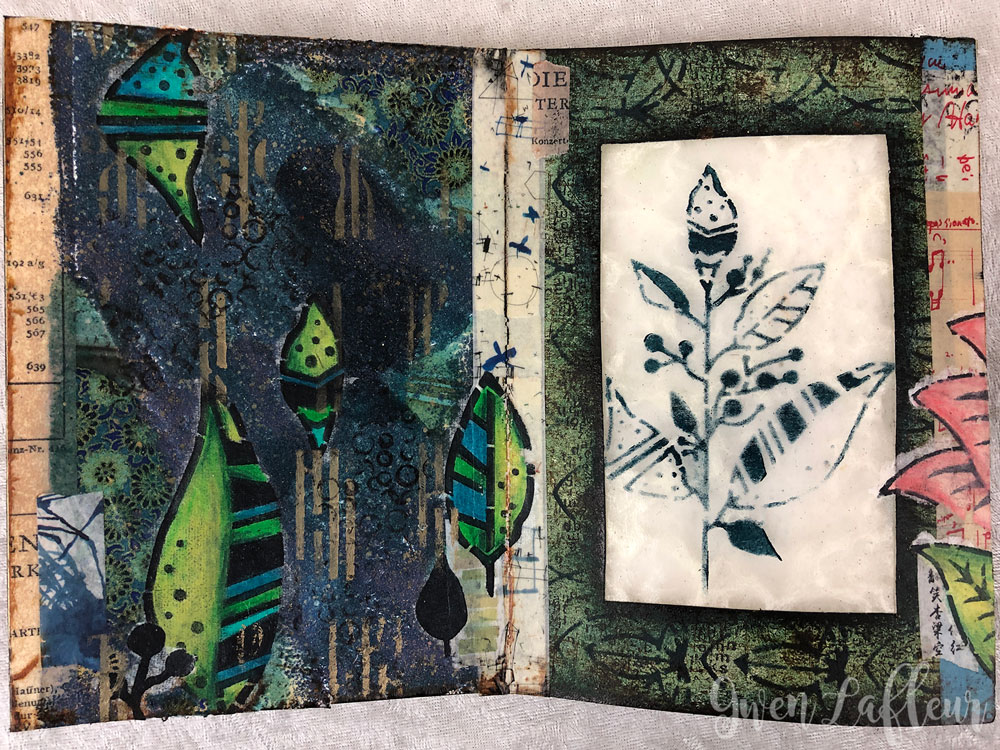
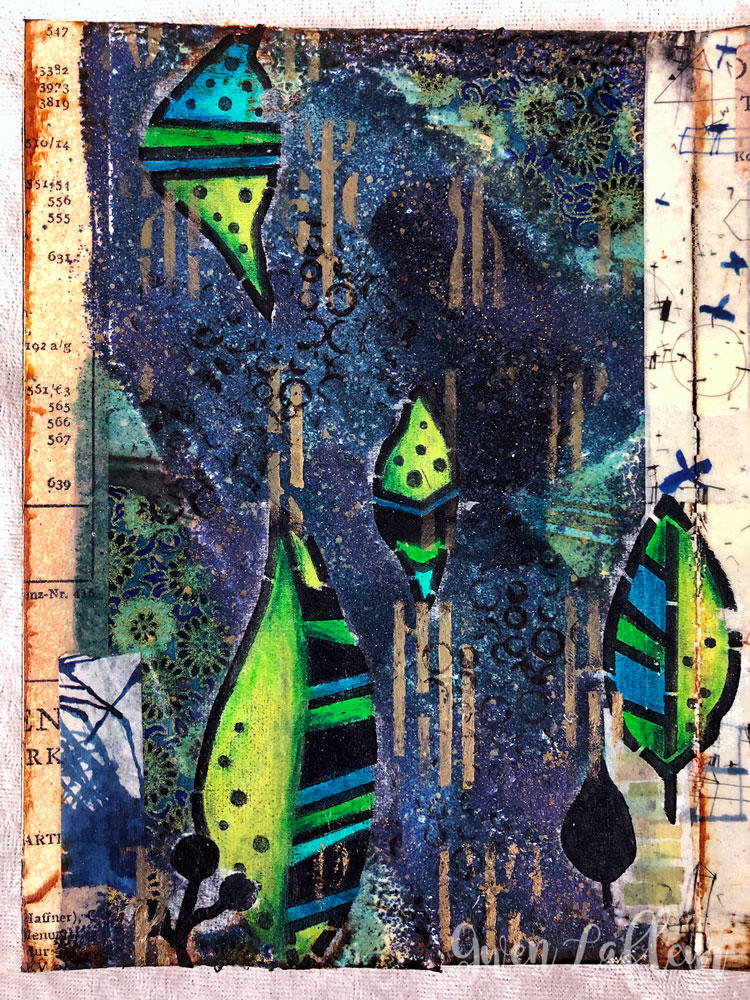
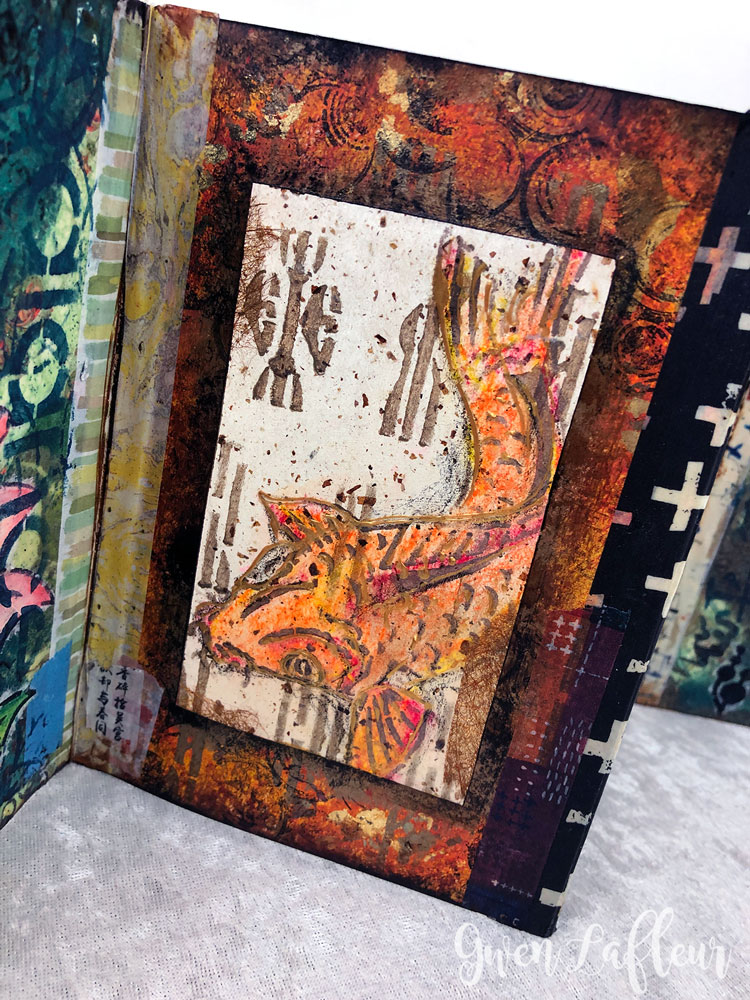
These new designs all feature imagery that I love and use in my own work and as always, they're heavily influenced by my travels. The Chinese Garden - Buddha, Lotus, and Koi stencils were inspired by my visits to various gardens and temples throughout Asia. The Buddha was directly taken from a pastel portrait in one of my art journals and the design of the Lotus stencil was inspired by a woodblock I found in India. Although the Koi are reminiscent of many places I've been fortunate enough to visit, my main inspiration came from a gorgeous and peaceful garden that appeared as the unexpected finish to a very long, hot, and unbelievably crowded hike through Xiang Jia Jie National Park in China. It was an incredible oasis in the midst of one of the most amazing settings I've ever seen. Here you can see a few of the ways that I've been using the new designs: 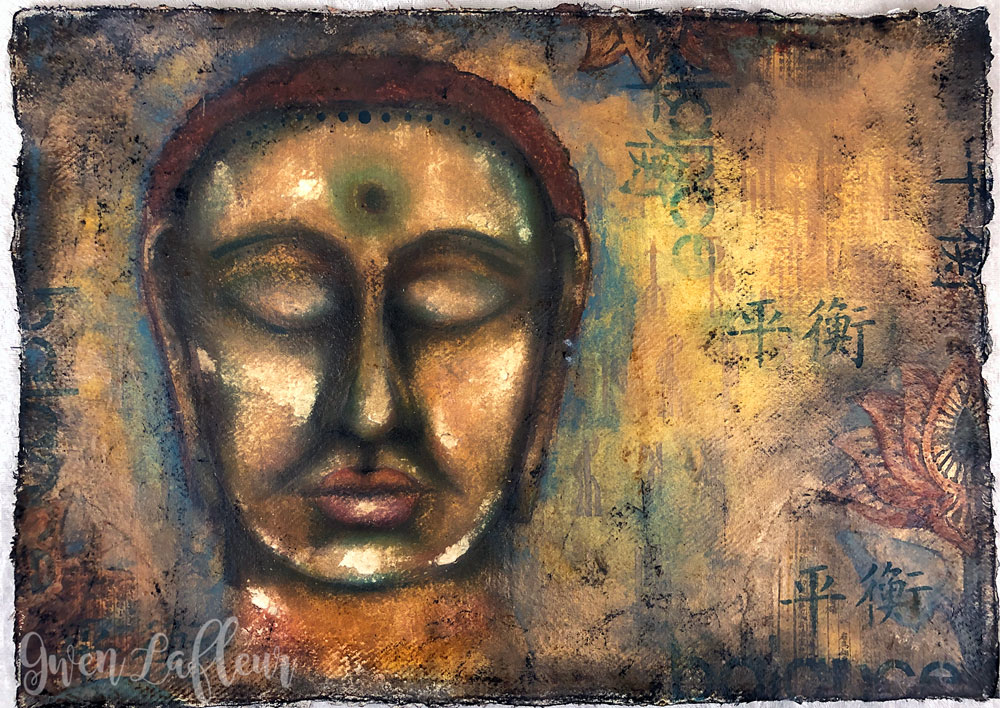 In this piece, I've used the Lotus stencil as a pattern to create a highly layered and textured piece with a lot of fabric and a bit of embroidery. 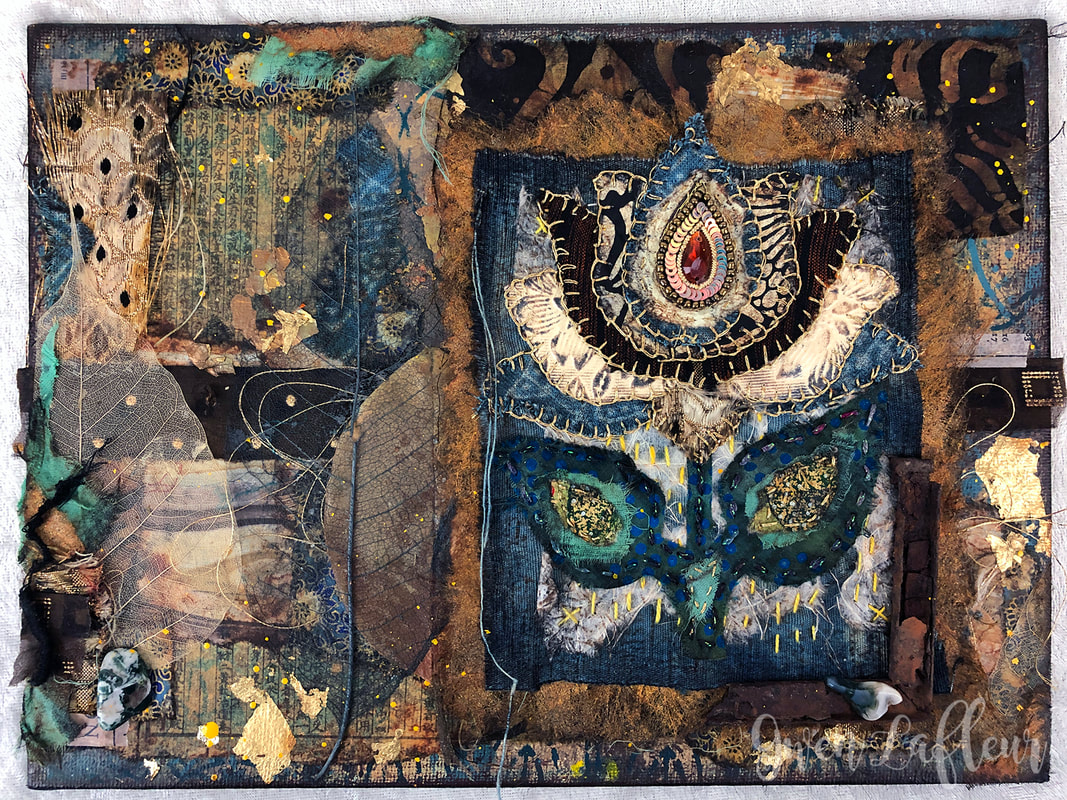 The Collage Textures and Patterns - Medieval Cyrillic stencil was partially inspired by several semesters of Russian language study in grad school, but more particularly by a once-in-a-lifetime journey through Russia on the Trans Siberian Railroad. We stopped nearly every day to go into various cities where I was fortunate enough to visit many Orthodox churches and cathedrals as well as a few museums - all full of the most gorgeous art, especially icons. Many of the icons feature writing and much of it is ornate and beautifully ornamental. The characters in this stencil are mainly comprised of combinations of different Cyrillic letters and, although it doesn't really say anything, I love using it for texture and pattern in my backgrounds. You can see this stencil sprinkled through the mini accordion art journal shared below along with the Collage Textures and Patterns - Leaves stencil which was inspired by wallpaper and upholstery in one of my favorite buildings near where I used to live in Utah. Click on any of the images to see the whole thing or to see it larger. I hope you enjoy the new stencils as much as I do. You can find all of my stencils, including the new designs, now available in my shop.
|
Categories
All
Archives
August 2023
|


 RSS Feed